Logon hours settings
Logon hours restrictions provide an ability to restrict user access to published resources during specified time frames using flexible expression-based rules.
Prerequisites
Time zone redirection is required to be set on the server in order for the feature to work as intended.
To enable group policy setting Allow time zone redirection:
- On the Active Directory server, open the Group Policy Management Console.
- Expand your domain and?Group Policy Objects.
- Right-click the GPO that you created for the group policy settings and select Edit .
- In the Group Policy Management Editor , navigate to Computer Configuration > Policies > Administrative Templates > Windows Components > Remote Desktop Services > Remote Desktop Session Host > Device and Resource Redirection .
- Enable the setting Allow time zone redirection .
Adding a logon hours rule
To add a new logon hours rule:
- In the RAS Console, navigate to Connection and select the Logon hours tab.
- Click Tasks > Add (or click the [+] icon).
- In the Name field, specify the name of the rule in the .
- in the Description field, specify the description of the rule
-
In the
Criteria
section, specify criteria for the rule. You will find the following controls:
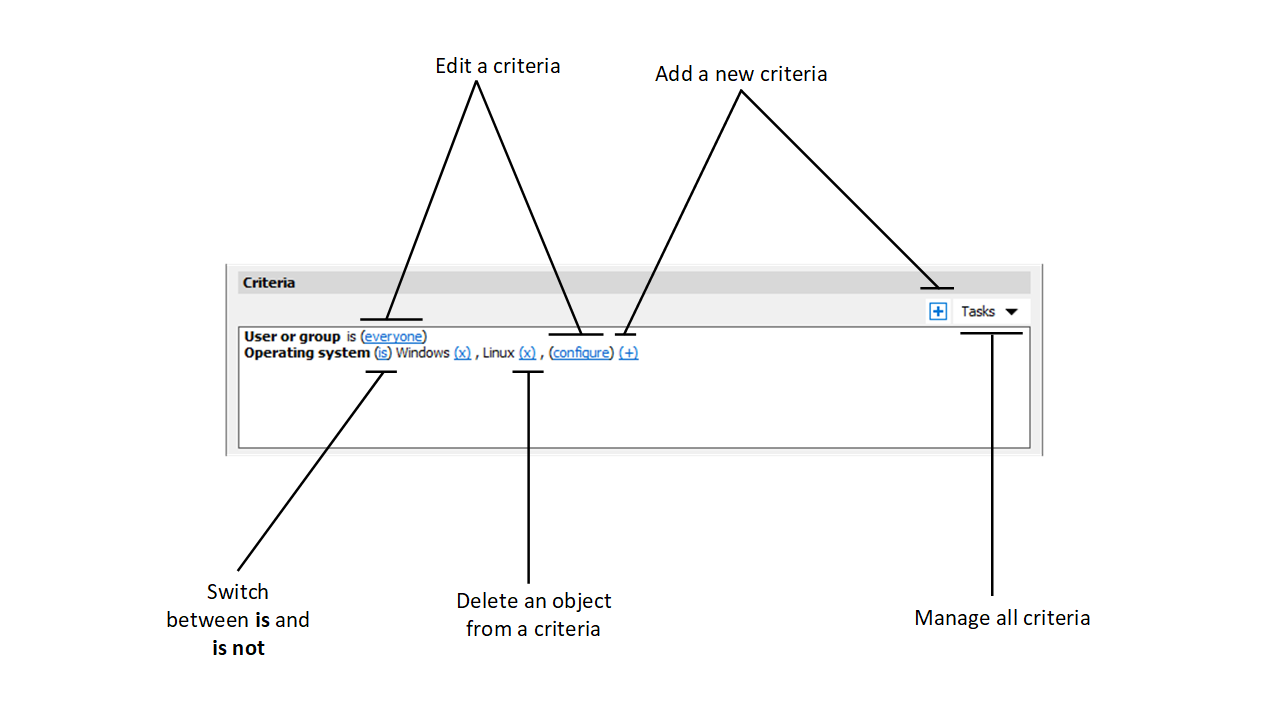
- (+) : adds a new criteria. If you want to match a Secure Gateway, a client device name, a client device operating system, an IP address or a hardware ID, click (+) . In the context menu that appears, select the type of an object that you want to match and add the specific objects in the dialog that appears. The new criteria appears on the next line.
- (X) : Deletes a specific object from matching. For example, you want to delete IP address 198.51.100.1 from matching, click (X) next to it. This control appears when at least one object is added. If all objects in a criteria are deleted, the criteria is removed.
- is and is not: specifies whether the logon hours rule must be applied when a user connection matches the criteria. Click on the link to switch between the two options. This control appears when at least one object is added.
- configure : edits the list of objects to be matched. Click this link to add or delete new objects. Note that for the first criteria ( User or group ) this link is called everyone . It will change to configure once you specify objects for this criteria.
- In the Logon hours specify the hours when users are permitted to log on. To deny logon during a certain day or period of time, select that day or time and click the Logon denied button that is located to the right of the table.
- Click OK .
- Click Apply .
You can also specify the following settings for a logon hours rule:
- Do not allow Parallels Client to connect outside of allowed logon hours: If selected, a Parallels Client is not allowed to connect to resources published on the site.
-
Disconnect user session if the time has elapsed:
If selected, shows users a notification that their sessions are going to be disconnected. After selecting this option, you can specify the settings below:
- Notify user before disconnect: Time when Parallels RAS notifies the user before the client is disconnected from the Farm.
- Allow user to extend session time: If selected, allows user to extend the session.
To specify these settings:
- In the RAS Console, navigate to Connection and select the Logon hours tab.
- Select the rule that you want to configure.
- Click the gear icon to the left of the Task menu. The Options dialog opens. From here, select the options that you want.