Printing
The Printing tab page allows you to configure printing options.
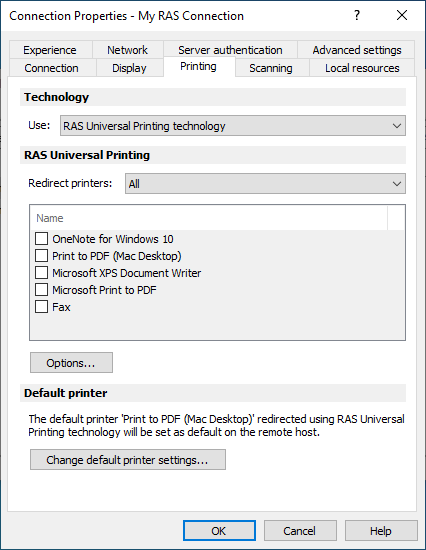
In the Technology drop-down list, select the technology to use when redirecting printers to a remote computer:
- None . Don't redirect printers.
- RAS Universal Printing technology . Select this option if you want to use RAS Universal Printing technology.
- Microsoft Basic Printing Redirection technology . Select this option if you want to use Microsoft Basic printing technology.
- RAS Universal Printing and Microsoft Basic redirection technologies. Select this option to use both Parallels RAS and Microsoft technologies.
RAS Universal Printing
If you selected RAS Universal Printing technology , select printers to redirect in the Redirect Printers drop-down list:
- All . All printers on the client side will be redirected.
- Default only . Only the Windows default printer will be redirected.
- Specific only . Select the printers to redirect from the provided list. The list becomes enabled only if you select this option.
The Options button opens the RAS Universal Printing Options dialog where you can configure additional printing options as described below.
In the Choose Format drop-down list, select a data format for printing:
- Print Portable Document Format (PDF). Adobe PDF. This option does NOT require you to install any local applications capable of printing a PDF document. All the necessary libraries are already installed together with Parallels Client.
- View PDF with external application . To use this option you must have a local application installed which is capable of viewing a PDF document. Note that not all applications are supported. For example, the built-in PDF viewer in Windows is not supported, so you must have Adobe Acrobat Reader (or a similar application) installed.
- Print PDF with external application . This option works similar to the View PDF option above. It also requires an application capable of printing a PDF document installed locally.
- Enhanced Meta File (EMF). Use vector format and embedded fonts.
- Bitmap (BMP). Bitmap images.
In the Client Printer Preferences section, select one of the following:
- Use server preferences for all printers . If this option is selected, a generic printer preferences dialog will be shown when you click Print in a remote application. The dialog has only a minimal set of options that you can choose.
- Use client preferences for all printers . With this option selected, a local printer preferences dialog will open when you click Print in an application. The dialog will contain a full set of options for a particular printer that you have installed on your local computer. If you have more than one printer installed, a native preferences dialog will open for any particular printer that you choose to print to.
- Use client preferences for the following printers . You can use this option when you have more than one printer installed on your local computer. This option works similar to the Use client preferences for all printers option (above), but allows you to select which printers should use it. If a printer is not selected, it will use the generic printer preferences dialog, similar to the first option in this list.
Default printer settings
To configure default printer settings, click the Change Default Printer settings button.
The default printer list shows printers that can be redirected. The list also includes the printing technology which the available printers will use. The technology reflects the setting selected in the Technology section. For example, if the technology was set to RAS Universal Printing technology , only the printers using RAS Universal Printing will be listed.
To disable the default printer, select <none> . To redirect the default local printer on the client side to the remote computer, select <defaultlocalprinter> . When <custom printer> is selected, you can specify a custom printer which might be installed on the remote computer. The first printer that matches the printer name inserted in the custom text box, will be set as the default printer on the remote computer.
Select Match exact printer name to match the name exactly as inserted in the custom text box. Please note that the remote printer name may be different than the original printer name. Also note that local printers may not redirect due to server settings or policies.
You can specify the time a printer will be forced as default. If the default printer is changed during this time after the connection is established, the printer is reset as default.
Select the Update the remote default printer if the local default printer is changed option to change the remote default printer automatically when the local default printer is changed. Please note that the new printer must have been previously redirected.
Note for Windows 10 users
Windows 10 has a feature that automatically sets the default printer to the one used most recently or more often. This can cause the default printer settings on a remote server to become invalid. To resolve this issue, the default printer management in Windows 10 should be disabled. This can be done for your by the IT administrator using the Group Policy or it can be done locally as follows:
- Click Start and then click the "gear" icon which will open the Settings page.
- Click Printers and Scanners .
- Turn the Let Windows manage my default printer option to OFF .
- Turn the Download over metered connections option to ON .