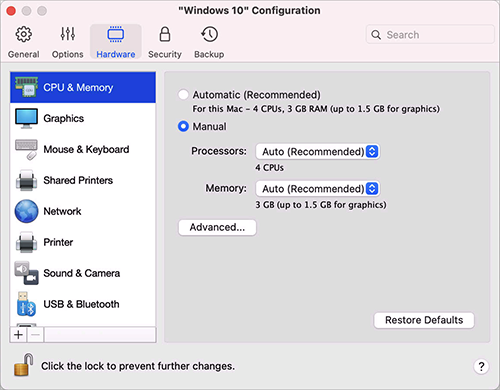
CPU & Memory Settings
In the CPU & Memory pane, you can view and configure the CPU- and memory-related settings.
To open these settings, choose Actions > Configure > Hardware , then click CPU & Memory .

|
Option |
Description |
|
CPU and memory allocation |
If you're using Windows 10 or later, Parallels Desktop allocates the required number of CPUs and amount of memory to the virtual machine automatically so that you get the optimal performance and good experience. It is recommended that you use the default settings. However, if you are not satisfied with the virtual machine performance, you can manually specify how much CPU and memory can be consumed by your virtual machine. Select Manual and choose the desired values from the corresponding fields. Virtual machines created and run in Parallels Desktop for Mac Standard Edition are limited to 4 vCPU cores and 8GB of vRAM. For the Pro and Business Editions, the limitations are as follows:
Please note that more is not always better. First try to work with your virtual machine using the default settings. If it is slow, try to add more memory and/or increase the number of CPUs. If the virtual machine became faster, it's ok. If not, try to change the CPU and memory allocation some other way. It is not easy to provide a more straightforward instruction because the virtual machine performance depends on the Mac's hardware, which apps are running on your Mac, which apps are running in the virtual machine, etc. If you have a virtual machine with Windows 8.1 or earlier, Linux or macOS operating system, you can choose how much CPU and memory can be consumed by the virtual machine using the Processors and Memory menus. |
|
Extended memory limit (available only in Parallels Desktop for Mac Pro and Business Editions installed on a Mac with an Intel processor) |
This option allows you to allocate more memory to a virtual machine than your Mac physically has. Use this option with care (or your system may significantly slow down) and only in rare cases. For example, when you're trying to install a database in to the virtual machine and the installer claims that you don't have enough memory. |
|
Hypervisor This menu is available only on Mac computers equipped with an Intel processor. Virtual machines created on Apple Silicon Macs always use the Apple hypervisor. |
In this menu, you can choose whether to use the hypervisor from Parallels or from Apple. It is recommended that you use the Parallels hypervisor. |
|
Adaptive Hypervisor |
Select this option to set Parallels Desktop to automatically optimize performance for the virtual machine or macOS depending on which application you're working with at the moment. When you're using a virtual machine app, more resources are given to the virtual machine, and when you're using a macOS application, more resources are given to macOS. |
|
Enable nested virtualization This menu is available only in Parallels Desktop for Mac Pro and Business Editions installed on a Mac with an Intel processor provided that the virtual machine is configured to use the Parallels hypervisor. |
Select this option to enable nested virtualization support. Parallels Desktop allows you to run:
If you use Parallels virtual machines to build, debug and test applications, enable nested virtualization to install and work in:
|