Installing Parallels Server Bare Metal in Text Mode
To install Parallels Server Bare Metal in text mode, follow the instructions below:
- Switch on the physical server where you want to install Parallels Server Bare Metal.
- Configure the server to boot from the CD/DVD-ROM drive.
- Insert a DVD containing the Parallels Server Bare Metal distribution set into the server's CD/DVD-ROM drive, and restart the server.
-
After the server boots, type
Tin the boot prompt, and press Enter. -
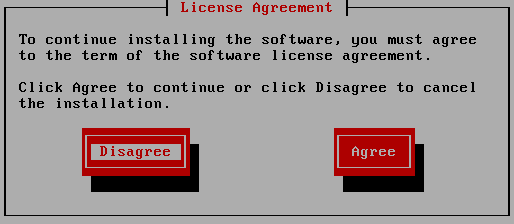
Read the Parallels end user license agreement, select
Next
, and press Enter. Accept the license agreement by selecting
Agree
in the displayed window and pressing Enter.

- In the Customer Experience Program window, you will be asked to join the Parallels Customer Experience Program. If you choose to participate in the program (select Next , and press Enter; then in the displayed dialog, select Agree , and press Enter), Parallels will periodically collect the information about your physical server and virtual machines and Containers configuration and use it to make the product better fit your needs. No private information like your name, e-mail address, phone number, and keyboard input will be collected.
-
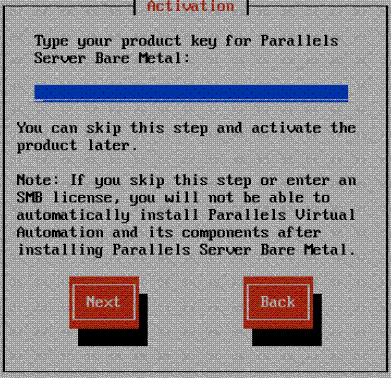
On the next screen, you are prompted to enter the Parallels Server Bare Metal license. Every physical server must have its own license installed. Licenses are issued by Parallels and needed to start using Parallels Server Bare Metal on your server. Type the product key for Parallels Server Bare Metal in the field provided, select
Next
, and press Enter.

You can also proceed without entering the product key and install the license after the Parallels Server Bare Metal installation. However, if you skip this step, you will not be able to automatically install Parallels Virtual Automation and its components once the Parallels Server Bare Metal installation is complete. For more information on installing Parallels Virtual Automation, see Step 15 .
Note : If your license does not support using the Parallels Virtual Automation application, the options for installing this application will be grayed out in the installer and you will not be able to select them. In this case, you must first upgrade the license and then install the Parallels Virtual Automation application manually. For more information, see Installing Parallels Virtual Automation Manually .
-
In the
Partitioning Type
window, choose the way of partitioning your hard drive.

For the purpose of this guide, we use the Remove all partitions on selected drives and create default layout option. This is the recommended way of partitioning your server. When this option is selected, the installation program automatically partitions your system and creates the default layout:
Partition
Description
/The root partition containing all Parallels Server Bare Metal files.
/vzThe partition intended to host all Containers and virtual machines data.
swapThe paging partition for Parallels Server Bare Metal.
Notes :
1. After you choose to automatically partition your system, select Next , and press Enter, you will be presented with a message warning you that all data on the selected drives will be removed. To confirm your decision and proceed with the installation, select Yes , and press Enter.
2. Choosing the Create custom layout option is recommended only if you have extensive experience in partitioning servers. For more information on this option, see Creating Custom Layout in Text Mode .
- In the Review Partition Layout window, select No , and click Enter.
-
Next, specify the network settings on the server. You can either configure your network interfaces or proceed without configuring them. To start configuring the network interface (if you have only one network interface), select
Yes
in the
Configure Network Interface
window, and click Enter. If you have two or more network interfaces, select the interface you want to configure, select
Edit
, and click Enter. For detailed information on configuring network interfaces, refer to
Configuring Network Settings
.
If you do not want to configure your network interfaces, select No , and
- press Enter if you have only one interface
- select Next and press Enter if you have two or more network interfaces
-
The
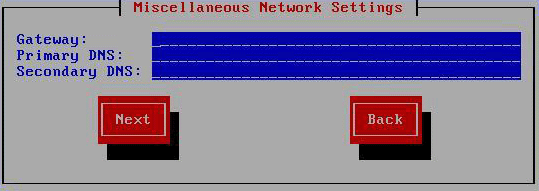
Miscellaneous Network Settings
window appears if you choose:
- not to configure the network interface
- to manually specify the IP address and network mask parameters during the network interface configuration
In this window, you are supposed to type the gateway IP address and primary and secondary DNS servers in the fields provided. If you do not know any of these parameters, ask your network administrator.

Note: If you do not specify the aforementioned parameters, you may experience network connection problems on your server.
-
After you have configured the network settings, specify the server hostname in the
Hostname Configuration
window. You can choose between the following options:
- automatically via DHCP . The hostname is automatically assigned to your computer by the DHCP (Dynamic Host Configuration Protocol) server in your network. Select this option if you use DHCP to automatically determine your network parameters.
- manually . You must manually type the hostname in the field provided.
- In the Time Zone Selection window, select the time zone to use. You can also select System clock uses UTC to set your system to UTC (Universal Time Coordinated), which makes it automatically switch between normal and daylight savings time. When finished, select Next , and press Enter.
-
In the
Root Password
window, set the root password, confirm it, select
OK
, and press Enter to start the installation.
Wait while the installer installs Parallels Server Bare Metal on your server. You can view the installation progress in the Package Installation screen.
-
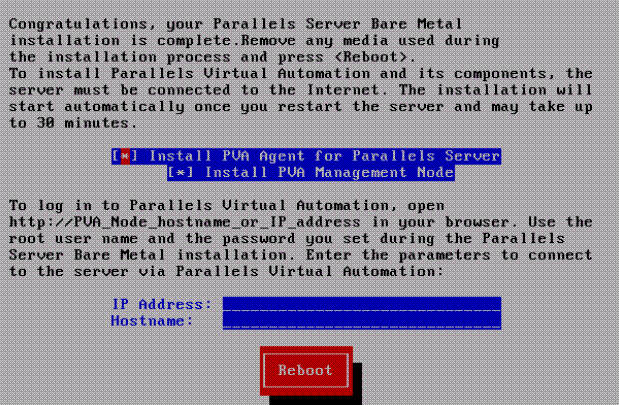
Once the installation is complete, the following window appears.

In this window, do the following:
- Remove the installation DVD from the server's CD/DVD-ROM drive, clear the Install PVA Agent for Parallels Server and Install PVA Management Node check boxes, and click Reboot to restart the server and complete the installation.
-
Leave the
Install PVA Agent for Parallels Server
and
Install PVA Management Node
check boxes selected to set up the Parallels Virtual Automation application and its components on the server. Using Parallels Virtual Automation, you can connect to the Parallels server and manage your virtual machines and Containers with your favorite browser.
If you select the check boxes, you will also need to specify a valid IP address and hostname in the IP Address and Hostname fields, respectively. Once the installation is complete, you can log in to Parallels Virtual Automation by opening
http://IP_address_or_hostnamein the browser and using therootuser name and the password you specified in the previous step.When the check boxes are selected, the Parallels Server Bare Metal installer performs the following operations after restarting the server:
- Downloads the installation packages for Parallels Virtual Automation from the Parallels web site to the server. Notice that the download process may take some time, depending on the speed of your Internet connection.
-
Installs Parallels Virtual Automation and its component on the server and inside a specially created Container. The installation is automatically initiated once the installation packages are downloaded to the server and runs without your interaction.
When you are ready, remove the installation DVD from the server's CD/DVD-ROM drive, and click Reboot to restart the server.
Notes :
1. You must have an active Internet connection to download the Parallels Virtual Automation installation packages.
2. You can use Parallels Virtual Automation to manage Parallels servers only if your license allows you to do so. If the license does not support using Parallels Virtual Automation, the Install PVA Agent for Parallels Server and Install PVA Management Node options will be grayed out and you will not be able to select them. In this case, you must first upgrade your license and then install the Parallels Virtual Automation application manually. For more information, see Installing Parallels Virtual Automation Manually .
3. For more information on setting up and using Parallels Virtual Automation, refer to Using Parallels Virtual Automation .
|
|
 Feedback
|