Express Windows Installation
-
Start Parallels Desktop and launch New Virtual Machine Assistant by clicking
New Virtual Machine
from the
File
menu or choosing
Virtual Machines Directory
from the
Window
menu and clicking the
 button in the displayed window.
-
In the
Introduction
window, click
Continue
to proceed with the virtual machine creation.
-
In the
Operating System Detection
window, click
Skip Detection
.
-
In the
Select Operating System Type and Version
window, select the Windows Server 2003, Windows XP, or Windows Vista guest OS and click
Continue
.
-
In the
Virtual Machine Type
window, select
Express Windows
and click
Continue
.
-
In the
Express Windows Installation
window, specify your user details and the Windows product key necessary for the Windows guest OS installation.
If you click the
Advanced
button, you can set the number of CPUs and the amount of RAM of your future virtual machine. Click
Continue
.
Note:
If you do not enter the Windows product key on this step, you will have to provide it later when the Windows guest OS installation starts.
-
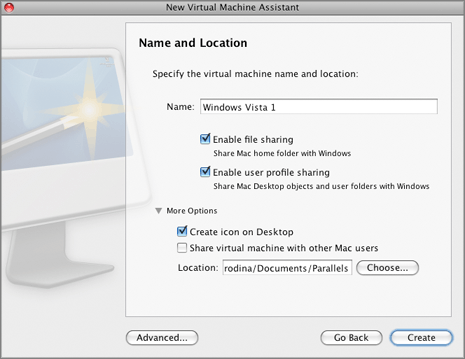
Define the main parameters for your virtual machine:
-
Name
. Indicate an arbitrary name to be assigned to the virtual machine. By default, the virtual machine gets the same name as the operating system that will be installed inside this VM. If a virtual machine with such a name already exists, you will be prompted to indicate another name. The name must not exceed 50 characters.
-
Select the
Enable file sharing
option if you want to have access to your Mac home folder from your Windows virtual machine. In this case the Mac home folder will appear in the My Computer window as an independent folder.
-
Select the
Enable user profile sharing
option if you want to access Mac desktop objects from the virtual machine's Windows desktop. With this option enabled, Windows folders and icons will be substituted with Mac desktop folders and icons, thus, allowing you to access them from both desktops.
Note:
A number of Windows-specific icons (such as the Recycle Bin and Shared Folders icon) always remain on the Windows desktop.
In the
More Options
section, you can configure the following virtual machine parameters:
-
Create icon on Desktop
. Select this option if you want to create a shortcut to the virtual machine configuration file on the Mac OS X Desktop.
-
Share virtual machine with other Mac users.
Select this option if you want to share this virtual machine with other users of your Mac. In this case all virtual machine-related files will be saved in the
\Users\Shared
folder on your Mac.
-
Location
. Use the
Choose
button if you want to change the default location of the virtual machine-related files.
This option also allows you to share the following user folders to Windows: Documents, Pictures, and Music. You can share all these folders or only some of them. To this effect, enable this option and go to the
Shared Profile Options
pane of Virtual Machine Configuration.
If you click the
Advanced
button, you can set the number of CPUs and the amount of RAM of your future virtual machine. Click
Create
.
-
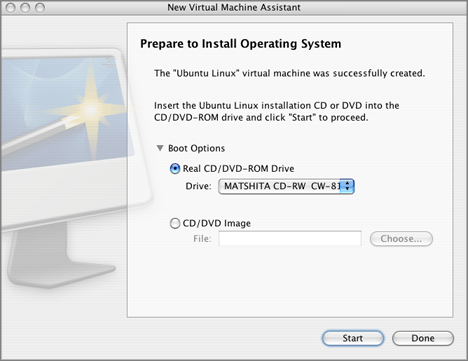
After the virtual machine is created, in the
Prepare to Install Operating System
window, specify the source of installation files and click
Start
. You can use the following types of installation media:
-
After you click
Start
, New Virtual Machine Assistant will automatically start the new virtual machine and install the guest operating system in it. After the guest OS has been successfully installed, Parallels Desktop installs Parallels Tools.
During the unattended installation, Parallels Desktop creates an administrator account with a blank password. When the guest OS installation is complete, we recommend that you change the password in order to protect the safety of your data.
To change the administrator password in Windows Vista:
-
Click the
Start
menu, then select
Control Panel -> User Accounts and Family Safety -> Change your Windows password
.
To change the administrator password in Windows XP (Professional Edition):
-
Click the
Start
menu, then select
Control Panel -> Administrative Tools -> Computer Management
.
-
In the
Computer Management
window, open
System Tools -> Local Users and
Groups -> Users
. Right-click the
Administrator
account and choose
Set Password
from the context menu.
For changing the password in other versions of Windows, refer to the Microsoft Windows Help:
Start -> Help and support.
Please send us your feedback on this help page