Default Installation Mode
Before creating a virtual machine in the
Default
mode, make sure that you have an operating system installation disc or its image.
Note:
Parallels Desktop doesn't provide you with the operating system installation discs and their images. You should purchase the installation disk or its image if you do not have any.
To create a new virtual machine:
-
Start Parallels Desktop and launch New Virtual Machine Assistant by choosing
New Virtual Machine
from the
File
menu or choosing
Virtual Machines Directory
from the
Window
menu and clicking the
 button in the displayed window.
-
In the
Introduction
window, click
Continue
to proceed with the virtual machine creation.
-
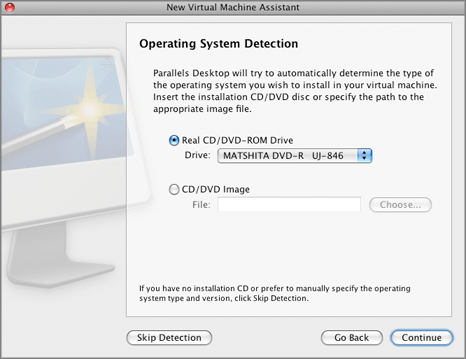
Parallels Desktop will try to automatically determine the type and version of your operating system. In the
Operating System Detection
window, specify the source of installation files and click
Continue
. You can specify the following types of installation media:
-
Real CD/DVD-ROM Drive
. Select this option if you inserted the installation disc into the optical drive of your Mac. Choose the drive you are using from the
Drive
list.
-
CD/DVD Image
. Select this option if you are using a CD/DVD disc image connected to the virtual machine's CD/DVD-ROM drive. Type the path to the file in the
File
field or use the
Choose
button to locate the file.
Note:
Parallels Desktop supports the following types of image files: ISO, CUE, CCD, and DMG.
If you click
Skip Detection
, you will be prompted to choose between the
Express Windows
,
Typical
, and
Custom
modes of creating a virtual machine.
-
In the
Detected System
window, specify the information necessary for the installation of the detected operating system.
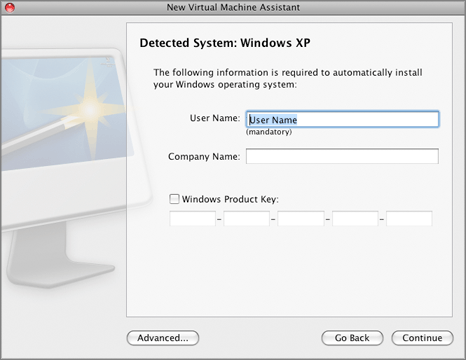
If you click the
Advanced
button, you can set the number of CPUs and the amount of RAM of your future virtual machine. Click
Continue
.
-
In the next step, you should define the main parameters for your virtual machine:
-
Name
. Indicate the name to be assigned to the virtual machine. By default, the virtual machine gets the name of the operating system that you selected to be installed in this virtual machine. If a virtual machine with this name already exists, you will be prompted to specify another name. The name must not exceed 50 characters.
-
Select the
Enable file sharing
option if you want to have access to your Mac home folder from your Windows virtual machine. In this case the Mac home folder will appear in the My Computer window as an independent folder.
-
Select the
Enable user profile sharing
option if you want to access Mac desktop objects from the virtual machine's Windows desktop. With this option enabled, Windows folders and icons will be substituted with Mac desktop folders and icons, thus, allowing you to access them from both desktops.
Note:
1. These two options are available for virtual machines with Windows 2000, Windows Server 2003, Windows XP, Windows Vista, and Windows Server 2008 operating systems. These settings come into effect after you install Parallels Tools in your virtual machine.
2. A number of Windows-specific icons (such as the Recycle Bin and Shared Folders icon) always remain on the Windows desktop.
To specify additional settings, expand the
More Options
area.
-
Create icon on Desktop
. Select this option if you want to create an alias for the virtual machine file on the Mac OS X Desktop.
-
Share virtual machine with other Mac users.
Select this option if you want to share this virtual machine with other users of your Mac. In this case the virtual machine file (PVM file) will be saved in the
\Users\Shared
folder on your Mac.
Note:
If you don't select this option, the virtual machine file will be saved in your home folder:
/<UserName>/Documents/Parallels/
.
This option also allows you to share the following Mac OS X user folders to your Windows virtual machine: Documents, Pictures, and Music.
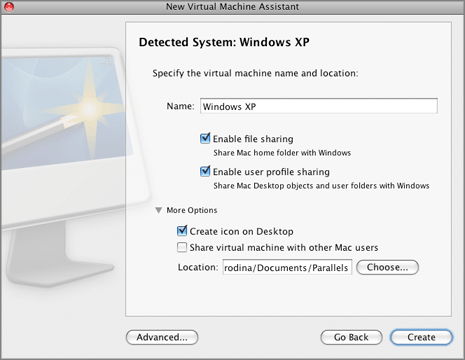
If you click the
Advanced
button, you can set the number of CPUs and the amount of RAM of your future virtual machine. Click
Create
.
-
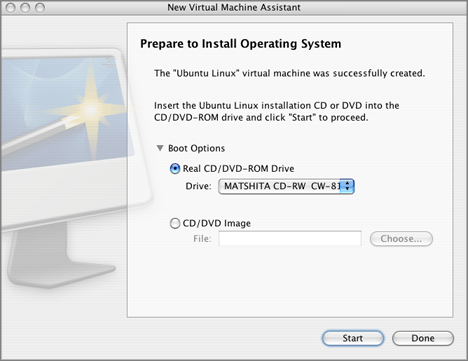
After the virtual machine is created, in the
Prepare to Install Operating System
window, click
Start
to begin the installation.
If you decide to install another operating system, you can specify the source of new installation files in the
Boot Options
section:
-
Real CD/DVD-ROM Drive
. Select this option to use a disc inserted into the CD/DVD drive of your Mac. Choose the drive to use from the
Drive
list.
-
CD/DVD Image
. Select this option to use a CD/DVD disc image connected to the virtual machine's CD/DVD drive. Type the path to the file in the
File
field or use the
Choose
button to locate the file.
When the installation is completed, install Parallels Tools if they are available for the guest OS you just installed. Refer to
the
Installing Parallels Tools
section
.
Please send us your feedback on this help page