Creating Software RAIDs
A software RAID consists of two or more physical hard disks combined to act as a single logical unit. Software RAIDs are created using special software and are meant for improving the disk performance and providing fault tolerance from disk errors.
You can create software RAIDs when installing Parallels Server Bare Metal on your server. To do this, select the Create custom layout radio button in the Partitioning window, and click Next . The main partitioning window appears:
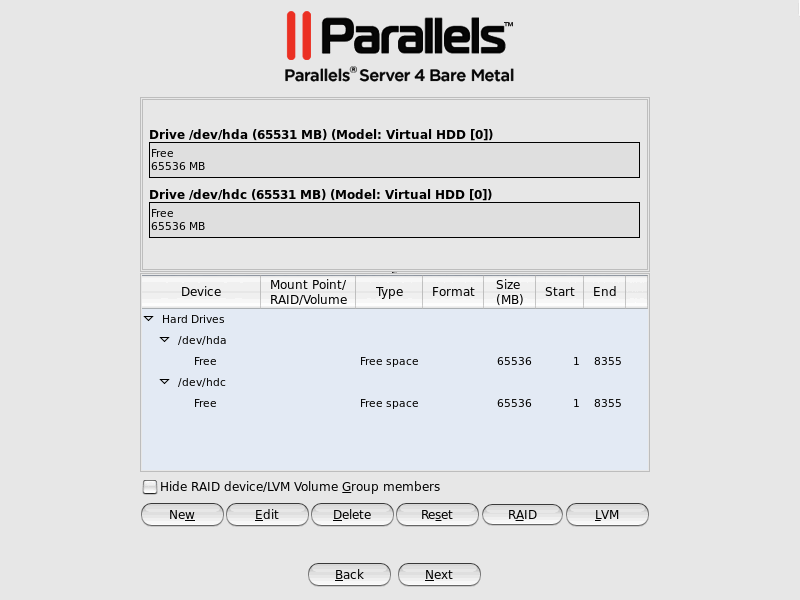
The process of creating software RAIDs is similar to that used to create software RAIDs in most modern Linux distributions (e.g., Red Hat Enterprise Linux or CentOS) and includes the following stages:
- Making software RAID partitions.
- Creating RAID arrays (or devices) from the newly made software RAID partitions.
This section describes how to create a software RAID for the
/vz
partition when running the Parallels Server Bare Metal installer in the graphical mode. However, you can easily adapt the procedures shown here to create software RAIDs for other partitions (e.g., for the root partition) in both the graphical and text modes.
Making software RAID partitions
In the first step, you need to create two or more identical software RAID partitions for the
/vz
partition. These RAID partitions will then be used as the basis for making a RAID array.
To create a software RAID partition:
-
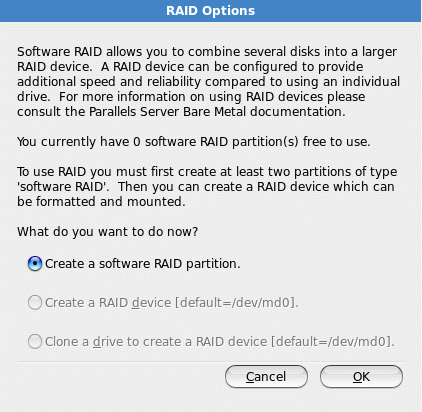
Click the
RAID
button in the main partitioning window to open the
RAID Options
dialog.
-
Make sure the
Create a software RAID partition
radio button is selected, and click
OK
. The
Add Partition
dialog appears.
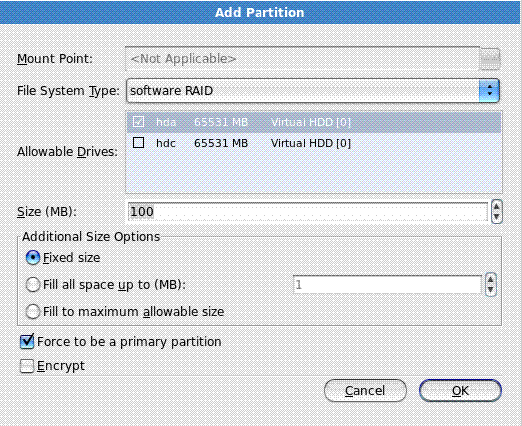
- In the Allowable Drives section, select the check box of the drive you want to use for the RAID. Make sure the check boxes of all the other drives are cleared. This is necessary because a software RAID partition can be situated on one disk drive only.
-
In the
Size
field, specify the size for the
/vzpartition. The/vzpartition is intended to store all virtual machines and Containers data and should occupy as much disk space as possible. -
Select
Force to be a primary partition
if you want to make the
/vzpartition a primary partition. - Click OK . The newly created software RAID partition will appear in the main partitioning window.
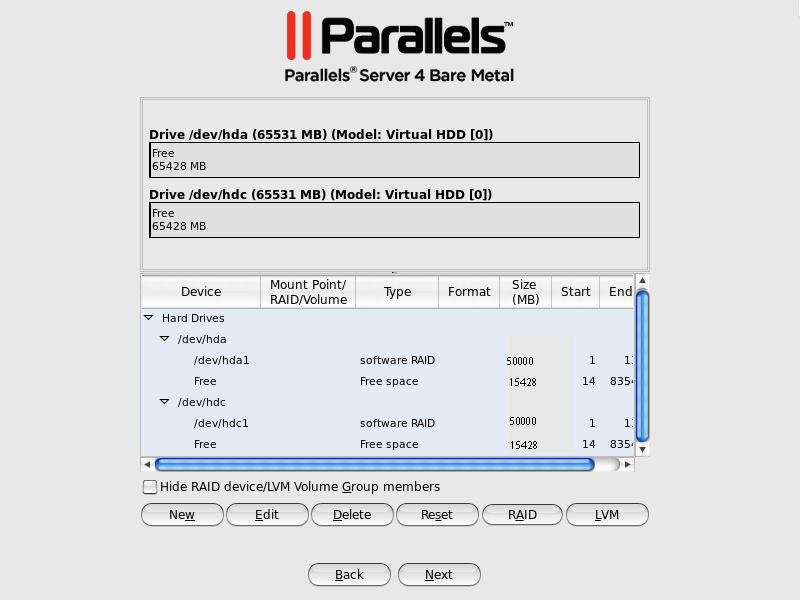
Repeat the steps above to create other software RAID partitions for the
/vz
partition. Their number will differ depending on the RAID configuration you want to implement. For example, if you are going to deploy the RAID 1 configuration where 2 mirrored hard drives are used, you need to create one more software RAID. Once you create it, your window should look like the following:
Creating RAID devices
Now that you have created the necessary RAID partitions for the
/vz
partition, you can make a RAID array on their basis. To do this:
-
Click the
RAID
button in the main partitioning window.
-
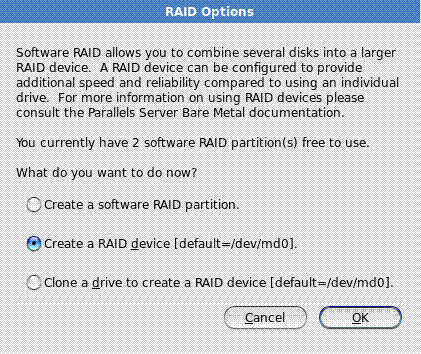
In the
RAID Options
dialog, select the
Create a RAID device
radio button, and click
OK
.
-
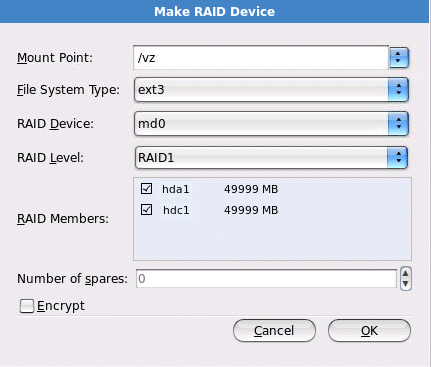
In the
Make RAID Device
dialog, set the parameters for the RAID device:
-
Specify a mount point in the
Mount Point
field. In our case, the mount point should be
/vz. -
Choose the filesystem type for the array in the
File System Type
field.
ext3is the recommended filesystem type to use on servers running Parallels Server Bare Metal. - Select a name for the RAID array in the RAID Device field. You can leave the name offered by default or specify your own one.
-
Choose the RAID level in the
RAID Level
field. For the
/vzpartition, you can choose any of the RAID levels available in the drop-down menu. -
The
RAID Members
section lists all your software RAID partitions. Select the check boxes next to the RAID partitions you created for the
/vzpartition. - Specify the number of spare partitions in the Number of spares field. Spare partitions can be configured in RAID 1 and RAID 5 implementations only.
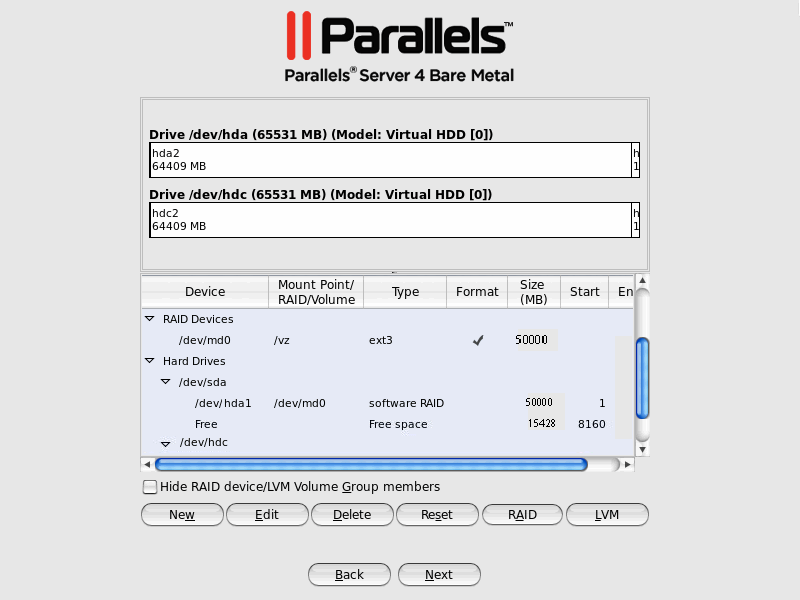
When you are done, click OK . The created RAID array will appear in the Devices column under RAID Devices .
-
Specify a mount point in the
Mount Point
field. In our case, the mount point should be
For more information on RAIDs, see https://raid.wiki.kernel.org/index.php/Linux_Raid .
|
|
 Feedback
|