Deleting and Removing a Virtual Machine
If you do not need some of your virtual machines anymore, you can either delete or temporarily remove it from Parallels Management Console.
Deleting a virtual machine means permanently erasing its files from the host computer. Make sure you transferred all the necessary data from the virtual machine before deleting it: this operation is irreversible. All the virtual machine data will be lost.
When removing a virtual machine from the Parallels Management Console window, you do not remove the virtual machine files from the host computer. You can easily add the removed virtual machine back to the virtual machines list with the help of Add Virtual Machine Wizard. For more information about adding virtual machines that were removed from the list, see Adding an Existing Virtual Machine .
You can delete a virtual machine using Delete Virtual Machine Wizard (or Delete Virtual Machine Assistant if Parallels Management Console is installed on a Mac-based physical computer) that finds and deletes all the virtual machine files. Or you can delete a virtual machine manually. However, we recommend that you use Delete Virtual Machine Wizard.
By default, Delete Virtual Machine Wizard removes all files that are stored in the virtual machine folder, including:
- configuration file
- virtual hard disk file(s)
- floppy disk image file(s), if any
- output files of serial and parallel ports, if any
To delete a virtual machine or remove it from the list:
- Launch Parallels Management Console.
- In the sidebar, select the virtual machine you want to delete or remove from the list.
-
Start Delete Virtual Machine Wizard by doing one of the following:
- choosing Remove from the File menu
-
right-clicking the virtual machine in the sidebar and choosing
Remove
form the shortcut menu
Note: Before deleting a virtual machine, make sure that it is stopped.
- In the Delete Virtual Machine Wizard Introduction window, click Next . To skip this window next time you start the wizard, select Always skip introduction .
-
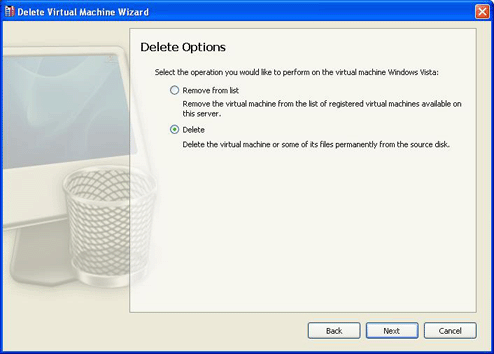
In the
Delete Options
window, select the operation you would like to perform on the virtual machine.
- To delete the virtual machine, select Delete and click Next . Proceed to step 6.
-
To remove the virtual machine from the sidebar, select
Remove
from list
and click
Remove
.
Note: If you remove the virtual machine from the list visible in Parallels Management Console, its files will not be removed from the host computer. You will be able to add this virtual machine back.

-
In the
File Selection
window, choose the virtual machine files to be deleted from the host computer and click
Delete
.
The wizard automatically selects the files that belong to the virtual machine, such as:
-
VM Configuration File
. The file has the
.pvsextension and defines hardware and resources configuration of the virtual machine. -
Hard Disk Image
. The file has the
.hddextension and represents a virtual hard disk of the virtual machine. -
Floppy Image
. The file has the
.fddextension and is a floppy disk image file. -
File
. The file has the
.DS_Storeextension and is a hidden file created by the host OS to store custom attributes of a folder. -
Logging File
. The file has the
.logextension and serves to record the data.

-
VM Configuration File
. The file has the
- When the operation is complete, click Done to exit the wizard.
|
|
 Feedback
|