|
|
|
|
Sharing
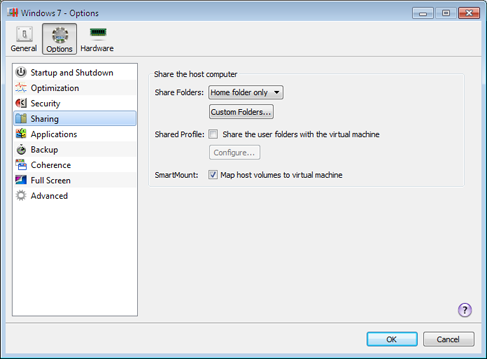
In the Sharing pane, you can configure a number of integration settings.
To edit these settings:
- Open the Virtual Machine menu and click Configure .
- In the Virtual Machine Configuration window, click Options and select Sharing in the sidebar.
Note: To be able to edit the Sharing settings, you must have Parallels Tools installed in the virtual machine and the Isolate host from guest option disabled in the Security pane.
Share Host OS Folders With Virtual Machine
To configure access to the disks and folders on the host computer from inside the virtual machine, click the Share Folders menu and select one of the following:
- Select All disks to provide the virtual machine with access to all disks and folders of the host computer.
- Select Home folder only to provide the virtual machine with access to the Home folder of the host computer.
- Select None to disable the host OS folders sharing.
Note: When you share the host OS disks or folders with a virtual machine, they still reside and occupy space on the hard disk of the host computer.
Define Host Computer Folder to Be Shared
To specify one or more host computer folders to be shared with the virtual machine, click Custom Folders and choose the folder to share with the virtual machine.
Share Profile
The Shared Profile functionality allows you to make host OS desktop and some of the Home folder items directly accessible from the Desktop and the corresponding folders in the Windows guest OS.
Note: The Shared Profile functionality is available for Windows guest operating systems only. [?]
To enable Shared Profile, select Share the user folders with the virtual machine , click Configure , and specify the following settings:
- Select Desktop to use the host OS desktop as the desktop in your Windows guest OS.
-
Select
Documents
to use the
Documentsfolder on the host computer as theMy Documentsfolder in your Windows guest OS. -
Select
Pictures
to use the
Picturesfolder on the host computer as theMy Picturesfolder in your Windows guest OS. -
Select
Music
to use the
Musicfolder on the host computer as theMy Musicfolder in your Windows guest OS. -
Select
Movies
to use the
Moviesfolder on the host computer as theMy Videosfolder in your Windows guest OS (available for Windows XP/Vista/7 only). -
Select
Downloads
to use the
Downloadsfolder on the host computer as theDownloadsfolder in your Windows guest OS (available for Windows Vista/7 only).
Warning: If you delete any host OS file from the Windows desktop when the host OS desktop sharing is enabled, you will not be able to find it in the host OS. The file will be permanently deleted from your computer.
For more information about the Shared Profile functionality, see Using Shared Profile . [?]
Map Host OS Volumes to Guest OS
The SmartMount feature allows you to automate the detection and mounting of removable devices in your virtual machines. You can automate the detection and mounting of:
- Removable drives . External storage devices such as USB hard disks and USB flash drives will be mounted to your guest OS.
- CD/DVD drives . CD and DVD drives or CD/DVD images will be mounted to your guest OS.
- Network folders . Network shares connected to the host OS will be mounted to your guest OS.
If the SmartMount functionality is enabled and you connect any of these devices to the host OS, this device is also automatically mounted to your guest operating system as a network drive. For example, a USB flash drive plugged in to the host OS will be accessible in both the host and guest OSs.
The permissions you will have for managing the mounted device from inside the virtual machine will coincide with those you have for this device in the host OS. So, if you can read from and write to a USB flash drive in the host OS, you will have the same permissions for this drive from inside the virtual machine.
To enable the SmartMount feature, select Map host volumes to virtual machine .
|
|
 Feedback
|