|
|
|
|
Using the Toolbar on Desktop Computers
Remote Desktop Toolbar
When you launch a remote desktop in a web browser on a desktop or laptop computer, the toolbar appears as follows:
![]()
The top area of the toolbar is used to drag the toolbar up or down. Click and hold it and then drag the toolbar to the desired position. The arrow icon is used to show or hide the toolbar items.
The main toolbar items are (from top to bottom):
- Full screen . Display the remote desktop in full screen on the local computer.
- Upload a file . Upload a file from the local computer to the remote server. After clicking this item, you are presented with two dialogs, one after another. In the first dialog, select a file on the local computer you wish to upload. In the second dialog, select a location on the remote server where you want to save the file.
- Download a file . Download a file from the remote server to the local computer. After clicking this item, select a file on the remote server you wish to download. Depending on your web browser configuration, the download will start automatically or you will be asked to select a destination folder on your local computer.
- Shortcuts . Display the Shortcuts menu (see below for the menu description).
- Clipboard . Display the remote clipboard. Please see Using the Remote Clipboard for more information.
The Shortcuts menu allows you to send keystrokes and key sequences to the remote desktop:
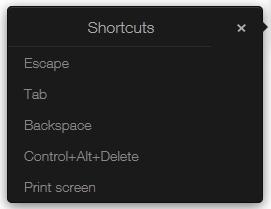
- Escape . Sends the "Escape" keystroke to the remote desktop.
- Tab . Sends the "Tab" keystroke.
- Backspace . Sends the "Backspace" keystroke.
- Control+Alt+Delete . Sends the Ctrl+Alt+Delete key sequence.
- Print screen . Sends the "Print Screen" keystroke. The screen will be printed to the clipboard of the remote desktop from where you can paste it into an application (e.g. Paint) running on the same remote computer.
Remote Application Toolbar
When you launch a remote application, the toolbar appears as follows:
![]()
The top area of the toolbar is used to drag the toolbar up or down.
The main toolbar items are (from top to bottom):
- Clipboard . Display the remote clipboard. Please see Using the Remote Clipboard for more information.
- Upload a file . Upload a file from the local computer to the remote server. After clicking this item, you are presented with two dialogs, one after another. In the first dialog, select a file on the local computer you wish to upload. In the second dialog, select a location on the remote server where you want to save the file.
- Download a file . Download a file from the remote server to the local computer. After clicking this item, select a file on the remote server you wish to download. Depending on your web browser configuration, the download will start automatically or you will be asked to select a destination folder on your local computer.
Hiding the Toolbar
If you need to completely hide the toolbar, so it will not appear on the end users' screens, you can do it by modifying the configuration file on the server side as follows:
-
Navigate to the
C:\Program Files (x86)\Parallels\ApplicationServer\2XHTML5Gatewayfolder. -
Open the
config.inifile. -
Add the following line to the file:
env_hide_panel = true
|
|
 Feedback
|