Publishing an Application from a Terminal Server
To publish an application from a terminal server follow the below procedure:
- In the RAS Console, select the Publishing category and then click the Add icon below the Published Resources tree (or right-click inside the Published Resources box and click Add in the context menu). This will launch the publishing wizard.
-
On the
Select Item Type
wizard page, select
Application
and click
Next.

- On the Select Server Type page, select Terminal Server and click Next.
-
One the
Select Application Type
page, select one of the following available options:
- Single Application . Choose this option to fully configure the application settings yourself such as the executable path etc.
- Installed Application . Choose this option to publish an application that is already installed on the server, therefore all of the application settings are automatically configured.
- Predefined Application . Choose this option to publish a commonly used Windows application such as Windows Explorer.
- Click Next .
-
On the
Publish From
page, specify from which terminal servers the application should be published. You have the following options:
- All Servers in Site . If selected, the application will be published from all servers that are available on the site.
- Server Groups . Select this option and then select individual server groups to publish the application from.
- Individual Servers . Select this option and select individual servers to publish the application from.
Please note that the Publish From wizard page will appear only if you have multiple terminal servers. If you have just one server, this page will be skipped by the wizard. The page will also be skipped if the application type that you are installing is Predefined Application (see the Select Application Type screenshot above).
- Click Next .
-
Depending on the application type that you selected on the
Select Application Type
page (see above), the next wizard page will be one of the following:
- If you selected Single Application , the Application page will open where you have to specify the application settings manually (more about this option later in this section).
- If you selected Installed Applications , the Installed Applications page will open listing available applications (the applications are grouped by functionality). Select an application you wish to install and click Next . Follows the instructions to complete the wizard.
- If you selected Predefined Application, the Select Predefined Applications page will open listing available applications. Select an application you wish to publish and click Finish .
-
If you selected
Single Application
on the
Select Application Type
wizard page, the
Application
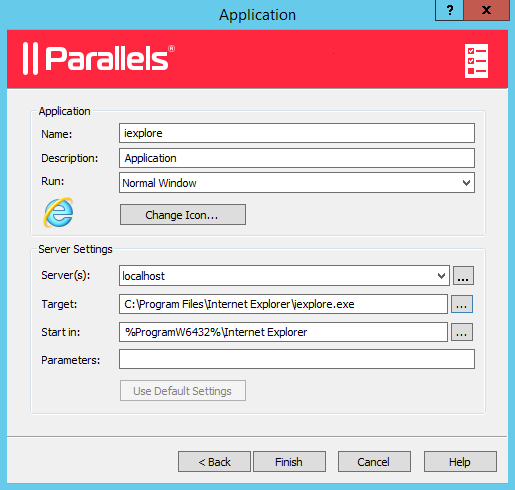
page will open at this point. Specify the application settings as follows (see the screenshot below):
Note that if you populate the Target field first using the "browse" button ( [...] ), the application Name , Description , and icon will be chosen automatically. You can override this selection if you wish.
- Name . Choose and type a name for the application.
- Description . Type an optional description.
- Run . Select the application window state (normal window, minimized, maximized).
- Change Icon . Change the application icon (optional).
- Server(s) . Allows you to specify the rest of the server parameters individually for each server the application was published from. Select a server from the drop-down list box and specify the parameters. Repeat for other servers in the list.
- Target . Specify the application executable path and file name.
- Start in . If the Target field is valid, this field will be populated automatically. You can specify your own path if needed.
- Parameters . If the application accepts startup parameters, you can specify them in this field.

- When done, click Finish to publish the application.
|
|
 Feedback
|