Managing Published Applications
Publishing and Application
The following sections of this guide describe in detail how to publish applications from different types of machines:
- Publishing an Application from a Terminal Server
- Publishing an Application from a Virtual Guest
- Publishing an Application from a Remote PC
Configuring a Published Application
When publishing an application using a wizard, you specify multiple application parameters such as name, executable path, etc. You can modify these options after the application has been published.
To modify a published application:
- In the RAS Console, select the Publishing category and then select the application in the Published Resources tree.
- Use the tab pages in the right pane to change the application options as described in the following subsections.
Configuring Sites through which a Published Application is Available
By default, a published application is available through all available sites. To restrict access to a specific site or a group of sites, select the desired site(s) in the Sites tab. Please note that if you have just one site, the Sites tab will be absent.
Configuring From Which Servers the Application is Published
You can specify the terminal servers from which an application will be published on the Publish From tab page.
Configuring Server Specific Application Settings
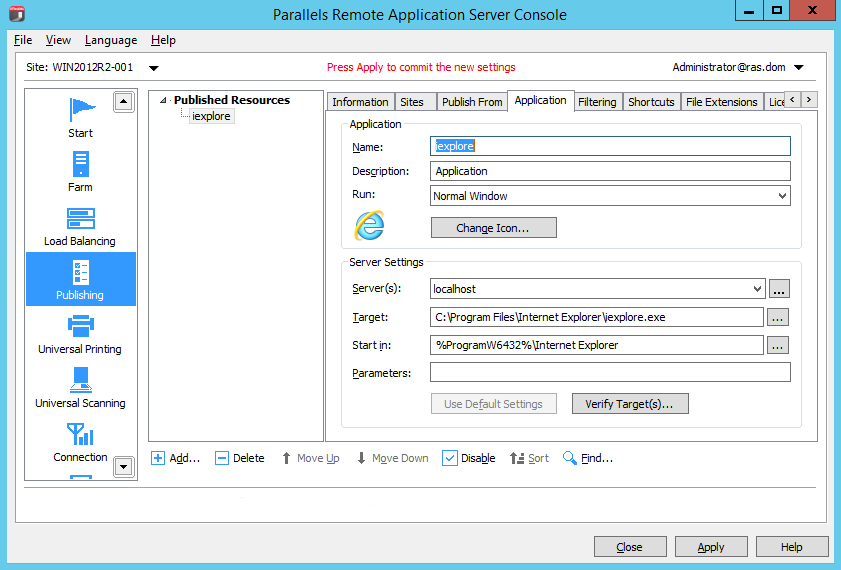
The Application tab page displays the application-specific settings. This includes the basic application settings (name, description, window state, icon) and the server settings, which include the servers the application was published from, the application path and file name on a server, the start-in folder, and parameters (if any).

If an application was published from multiple servers, the Server(s) drop-down list can be used to select individual servers and see the Target , Start in , and Parameters values for a particular server. By default, when you publish an application, these values apply to all servers an application is published from. It is possible that one (or more) of the servers has the application installed in a different folder, in which case the specified application path will be invalid.
To verify that the specified Target and Start In values are correct for all servers, click the Verify Target(s) button. The Target Verifier dialog opens listing each server and the verification status in the Progress column.
If the application is installed at a different path on one of the servers, the Progress column will indicate an error, as shown in the screenshot above. In such a case, close the Target Verifier dialog and then select the server in the Server(s) drop-down list. Specify new values in the Target , Start In, and (if necessary) Parameters fields specific for that server. Click Apply to save your changes.
The Target Verifier dialog can also be used to verify the targets for all published applications at once. To do so, right-click Published Resources (the root node of the Published Resources tree) and then click Verify Target(s) in the context menu.
This time, the Target Verifier dialog will contain all published applications and their verification status.
Configuring Shortcut Options for a Published Application
Note: This option is not available on all operating systems.
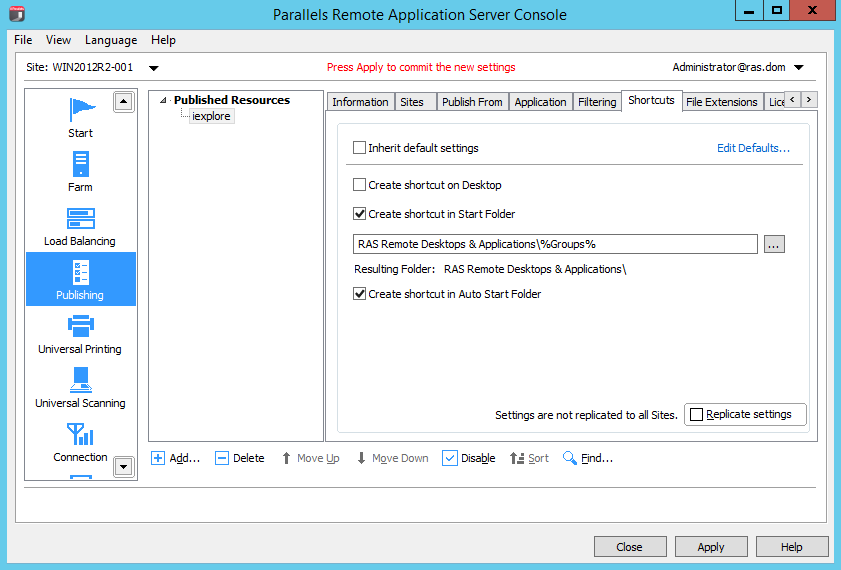
Click the Shortcuts tab to enable the creation of shortcuts on the user’s desktop, in the Start folder, and shortcut in the Auto Start folder. When the Auto Start shortcut option is selected, the application will be started when the operating system on the client is started.
To use the default settings, select the Inherit default settings option. You can view or modify the default settings by clicking the Edit Defaults link.

Configuring File Extension Associations
To modify file extension association for a particular published application, click the File Extensions tab.
A list of typically associated file extensions is automatically generated once an application is published. If you would like to modify the preconfigured list and add, remove, or modify an existing entry, select the Associate File Extensions option. To add a new extension to the list, click Add in the Tasks drop-down menu (or click the + icon) and specify the desired extension.
To modify an existing association, highlight the extension and click Properties in the Tasks drop down menu (or double-click the Parameters column) and type the parameter.
Configuring Licensing Options for Published Applications
Click the Licensing tab to configure the following licensing options:
- Disable session sharing. If this option is enabled, it allows you to isolate the published application to one session. Therefore if the same application is launched twice, the two instances of the application will run in two isolated sessions.
- Allow users to start only one instance of the application. If this option is enabled, a user can only launch a single instance of the application.
- Concurrent Licenses. Use this option to specify the maximum number of concurrent instances the application can run. E.g. if the license of the application allows you to only run 10 instances of the application, set the Concurrent licences option to 10 so once such limit is reached, other users cannot initiate other instances.
- If limit is exceeded . From this drop down menu you can specify what action should the Parallels Remote Application Server take in case any of the above licensing configured limits are exceeded.
To use the default settings, select the Inherit default settings option. You can view or modify the default settings by clicking the Edit Defaults link.
Configuring Display Settings for a Published Application
Click the Display tab to configure the color depth of the published application, resolution, width and height. To use the default settings, select the Inherit default settings option. You can view or modify the default settings by clicking the Edit Defaults link.
Filtering
Filtering is comprehensively described in the Filtering Rules by User, Client, MAC, and Gateway section .
|
|
 Feedback
|