|
|
|
|
Setting Up a Shared Folder
Setting up a shared folder includes two steps:
- Installing Parallels Tools in the virtual machine.
- Adding shared folders to the virtual machine.
Installing Parallels Tools
To use shared folders, you first need to install Parallels Tools in the virtual machine. For more information on installing Parallels Tools, see Using Parallels Tools .
Adding a Shared Folder
Once you install Parallels Tools, you can add a shared folder to the virtual machine:
- Open the Virtual Machine Configuration dialog by choosing Configure from the Virtual Machine menu.
- In the Virtual Machine Configuration dialog, select the Options tab, and click the Sharing pane (see Shared Folders Settings ).
-
Click the
Custom Folders
button, and then click the plus (
 ) button.
-
In the
Browse for Folder
dialog window, locate the folder you want to share, and click
Open
. For example, if you share the
/usrfolder, your window will look like the following: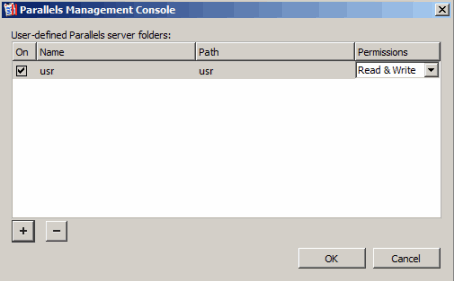
-
In the
Permissions
column, set security permissions on the folder:
- Select the Read only option to permit viewing and listing files and subfolders in the shared folder from inside the virtual machine.
- Select the Read & Write option to permit adding files and subfolders along with viewing and listing files and subfolders in the shared folder from inside the virtual machine.
- In the Name column, you can change the name under which the folder will be displayed in the virtual machine. To do this, double-click the current name and type a new name in the field provided.
- Click OK to save the settings.
|
|
 Feedback
|