|
|
|
|
Creating Virtual Machines in Custom Mode
To create a custom virtual machine:
- Start Parallels Management Console, and choose New from the File menu. This launches the New Virtual Machine wizard.
- In the Select Operating System Type and Version window, select the guest OS you plan to install in the virtual machine, and click Next .
- In the Virtual Machine Type window, select Custom and click Next .
-
In the
Name and Location
window, define the name and location for your virtual machine:
- Name . Indicate an arbitrary name to be assigned to the virtual machine. By default, the virtual machine gets the same name as the operating system you install in it. If a virtual machine with such a name already exists, you are prompted to indicate another name. The name must not exceed 50 characters.
-
Location
. Use the
Choose
button, if necessary, to change the default location of the virtual machine files.

Click Next .
-
In the
CPU and Memory Options
window, specify the number of CPUs and the amount of RAM for the virtual machine, and click
Next
. You can use the slider or arrow buttons to set the value or simply type it into the corresponding field.

-
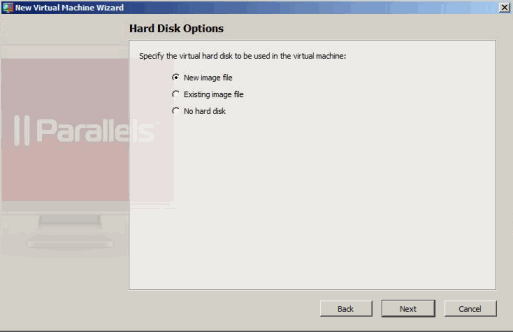
In the
Hard Disk Options
window, select the type of virtual hard disk you want to use, and click
Next
. You can create a new hard disk image, use an existing one, or create a virtual machine without any hard disk at all.
-
The next step differs, depending on which option you choose In the previous step:
- If you choose No hard disk , go to Step 8 .
- If you choose Existing image file , the Existing Virtual Hard Disk window appears. In this window, specify the hard disk image to connect, and click Next .
-
If you choose
New image file
, the
Hard Disk Options
window appears. In this window, specify the capacity and type of the virtual disk, and click
Next
.

-
In the
Networking Type
window, select the type of networking you want to use in the virtual machine, and click
Next
.
- Virtual Network . If you select this option, the virtual machine will be connected to one of the virtual networks available on the Parallels server.
- Routed Networking . If you select this option, the virtual machine will appear as a full member on the network, and its traffic is routed via one of the virtual adapters on the Parallels server.
- Direct Assignment (using Intel VT-d) . This option is available only if a PCIe network adapter is installed on the Parallels server and the Intel VT-d technology is enabled on it. If you select this option, the virtual machine will be able to access the local network and Internet through the specified PCIe network adapter.
-
No Networking
. If you select this option, the virtual machine will have no network adapter.
Note: You can reconfigure the networking settings after creating the virtual machine.
-
This step differs depending on the option you select in the previous step:
- If you select the No Networking option, go to Step 10 .
- If you select the Direct Assignment (using Intel VT-d) option, the Network Adapter window appears. In this window, select the PCIe network adapter you want to use, and click Next . Notice that before using the PCIe adapter in the virtual machine, you need to assign it in the Intel VT-d pane of the Server Settings dialog and install the manufacturer's driver for this PCIe device. The driver must support the Intel VT-d technology.
- If you select the Virtual Network option, the Network Adapter window appears. In this window, select the virtual network where to connect the virtual machine network, and click Next .
-
In the
Optimization Options
window, select the optimization mode, and click
Create
. You can choose one of the following options:
- Virtual machine (Recommended) . Select this option to allocate most of the server resources to the virtual machine and its applications.
- Host Computer . Select this option to allocate most of the resources to the server and its applications.
-
Once the virtual machine is created, the
Install Operating System
window appears. In this window, specify the source of installation files:
-
Select the installation source in the
Placement
list. Choose
Physical Serverif your source installation files are located on the Parallels server or chooseClient Computerif the source installation files are located on the physical computer where Parallels Management Console is installed. If Parallels Management Console is installed on the Parallels server, in the Placement list, you will be able to choose onlyPhysical Server. -
Specify the path to the source installation files. If you want to use a disc inserted into the computer's CD/DVD drive, choose this drive from the
Source
menu. If you want to use a CD/DVD disc image connected to the virtual machine's CD/DVD drive, click the
Source
menu and use
Choose an image file
to locate the file.
Notes:
1. OS installation CDs and DVDs are not included with your Parallels product. You must obtain an operating system separately.
2. For a Linux virtual machine, the source installation files may be located on the Parallels server only.

- To start the virtual machine and guest OS installation, click Start . When the installation is complete, install Parallels Tools if they are available for the guest OS. If you do not want to start the virtual machine and install the guest OS, click Done .
-
Select the installation source in the
Placement
list. Choose
|
|
 Feedback
|