|
|
|
|
Registering a New Parallels Physical Server
Parallels Management Console allows you to work with Parallels physical servers and their virtual machines. Before you can start to work, you should register these servers in Parallels Management Console.
To register a Parallels physical server:
-
Launch Parallels Management Console and do one of the following:
- choose Add Server from the Server menu
- right-click the sidebar of the Parallels Management Console window and choose Add Server from the shortcut menu
The Parallels Server Login dialog opens.
-
In the
Parallels Server Login
dialog, specify the server you want to register and your user account properties.
Note: To be able to register a Parallels physical server, you should have an account on it.
-
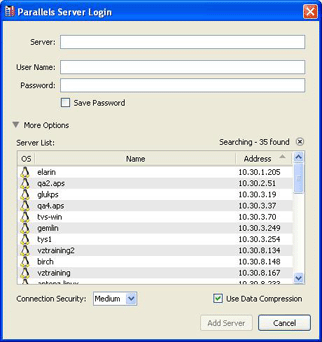
Server.
In this field, you can type the Parallels physical server IP address or its network name. You can also choose the server to connect to from the
Server List
available in the
More Options
area.
By default, Parallels physical server listens for connections on port 64000. If the listening port number differs from the default, type the number of the port right after the server IP address. For example, if Parallels physical server uses port 64001 for connections, type
127.0.0.1:64001into the Server field. - User Name . In this field, type your user login for this server.
- Password . In this field, type your password to access this server.
If you want Parallels Management Console to remember your login and password, select the Save Password option. With this option selected, you do not need to specify your user account properties each time you connect to this server.
-
Server.
In this field, you can type the Parallels physical server IP address or its network name. You can also choose the server to connect to from the
Server List
available in the
More Options
area.
-
You can expand the
More Options
area to see the list of the servers available on the current network and specify additional settings.
-
Server List.
This list contains Parallels physical servers found on the network. It displays the server network name, its IP address, and the type of primary OS installed in it.
Note: This list will be populated by those servers that currently appear on the network and can receive the broadcast message.
- Connection Security . In this field, you can choose the security level for the connection between Parallels Management Console and the Parallels physical server. You can change the level later in the Login pane of the Server Settings dialog.
- Use Data Compression . If you select this option, the data sent between Parallels Management Console and Parallels physical server will be compressed. If you use low-speed connections, select this option to improve the data transfer speed. You can change this setting later in the Login pane of the Server Settings dialog.
-
Server List.
This list contains Parallels physical servers found on the network. It displays the server network name, its IP address, and the type of primary OS installed in it.
- When you click Add Server , the selected server appears in the sidebar of the Parallels Management Console main window.
To connect to this server by default when you launch Parallels Management Console, edit the Login settings in the Server Settings dialog.
|
|
 Feedback
|