|
|
|
|
Adding and Removing Devices
Adding new devices to a virtual machine is easier than connecting new devices to a real computer. Removing or disconnecting devices is also easy. The following virtual devices can be added to the configuration or removed from it:
- virtual hard disk drive
- CD/DVD drive
- floppy disk drive
- network adapter
- serial port
- printer port
- sound device
- USB controller
Any of the aforementioned devices can be added to the corresponding virtual machine only when it is stopped.
Note : To be able to connect any virtual device to a real one, you should have system privileges to access the real device. Otherwise, the real device will not appear in the list of available devices even though it is installed on your computer.
Adding a New Device to a Virtual Machine
- Choose Configure from the Actions menu to open Virtual Machine Configuration.
- Click the Hardware button at the top of the Virtual Machine Configuration dialog to open the pane for editing hardware devices.
-
Click the
Add
button
 in the bottom part of the
Virtual Machine Configuration
dialog and select the device to be added to your virtual machine.
in the bottom part of the
Virtual Machine Configuration
dialog and select the device to be added to your virtual machine.
Note: The Add button is disabled when the virtual machine is running. You need to stop the virtual machine before you can use this button.

-
If you selected any device except for a hard disk, the corresponding device with a typical configuration is added at once and ready for use.
If you selected a hard disk, you should specify some parameters:
- The hard disk type: a new image file or an existing one. Select Boot Camp if you want to add an existing Boot Camp partition as a hard disk to your virtual machine.
- The hard disk location. Provide the path on your Mac to the existing image file or the path and name for the new image file. By default, Parallels Desktop offers to save the new image file in the virtual machine PVM bundle.
- The hard disk size for the new hard disk image file.
- For the new hard disk image file, you can choose one of the following formats: Expanding or Plain . By default, the hard disk will have the Expanding format. To create a Plain hard disk, clear the Expanding disk option. If you want the virtual hard disk to be split, select the Split the disk image to 2 GB files option. For more information on hard disk formats, refer to Support for Virtual and Real Disks .
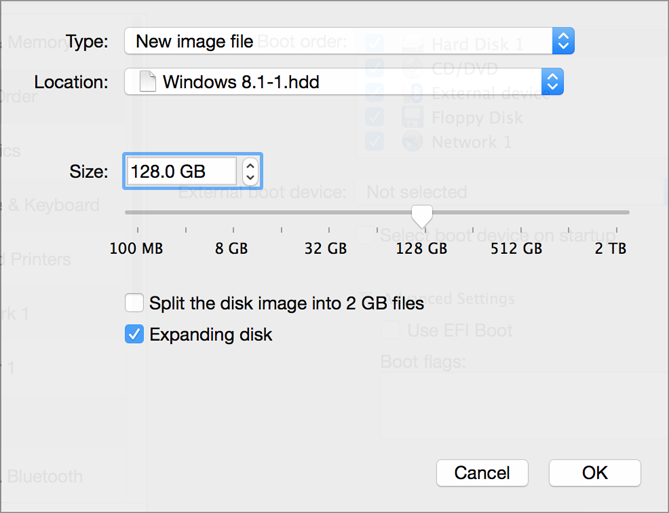
Click OK , to add the hard disk. After you added a new virtual hard disk to the virtual machine configuration, it will be invisible to the operating system installed inside the virtual machine until the moment you initialize it. For detailed information on how to initialize the newly added hard disk, see Initializing the Newly Added Disk .
After the new device is added, you can manage its properties as usual and start using it.
Removing Devices From the Virtual Machine Configuration
- Choose Configure from the Actions menu to open Virtual Machine Configuration.
- Click the Hardware button at the top of the Virtual Machine Configuration dialog to open the pane for editing hardware devices.
-
Select the device you want to remove and click the
Remove
button
 in the bottom part of the
Virtual Machine Configuration
dialog.
in the bottom part of the
Virtual Machine Configuration
dialog.
|
|
 Feedback
|