|
|
|
|
Invite users
Your Parallels RAS Farm is now fully operational. You have an RD Session Host and published application(s). All you need to do now is invite your users to install the Parallels Client software on their devices and connect to the Parallels RAS Farm.
To invite users:
- In the Parallels RAS Console, select the Start category and click the Invite Users item.
-
The
Invite Users
wizard opens. On the first page, specify the mailbox information that should be used to send invitation emails to users.
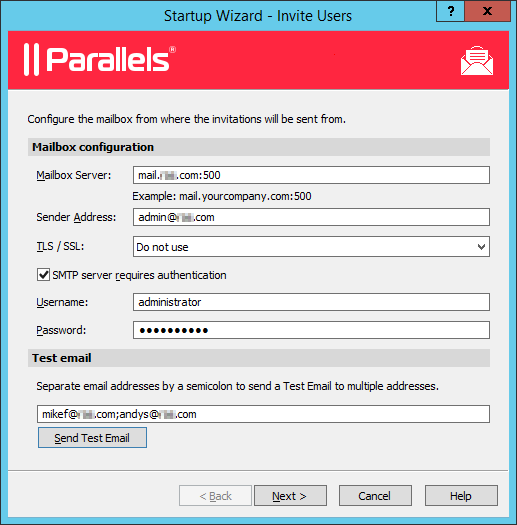
Specify the following options:
- Mailbox Server: Enter the mailbox server name. For example, mail.company.com:500
- Sender Address: Enter the email address.
- TLS / SSL: Choose whether to use the TLS/SSL protocol.
- SMTP server requires authentication: Select this option if your SMTP server requires authentication. If it does, also type the username and password in the fields provided.
In the Test Email section, type one or more email addresses to which a test email should be sent (separate multiple address with a semicolon). Click the Send Test Email button to send the email.
- Click Next .
-
On the next page of the wizard, specify target platforms and connection options:
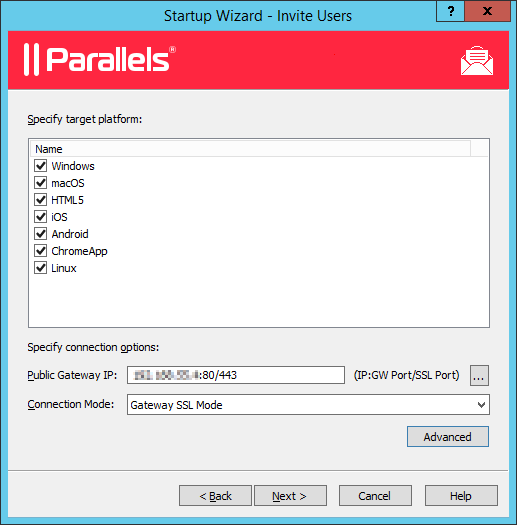
- In the target devices list, select the types of devices to send an invitation to. Each target device of a particular type will receive an email with instructions on how to download, install, and configure the Parallels Client software on that device type.
- In the Public address field, specify a public FQDN or IP address. This setting is used by the Preferred routing functionality to redirect client connections. Please see Configuring preferred routing .
- In the Connection Mode drop-down list, select the RAS Secure Client Gateway connection mode. Please note that SSL modes require the gateway to have SSL configured. More information can be found in the Configuring RAS Secure Client Gateway section.
- Optionally, click the Advanced button to open the Advanced Settings dialog. This dialog allows you to specify a third-party credential provider component. If you use such a component to authenticate your users, specify its GUID in this dialog. For more information, see Configure Client Policy Options > Single Sign-On .
- Click Next .
-
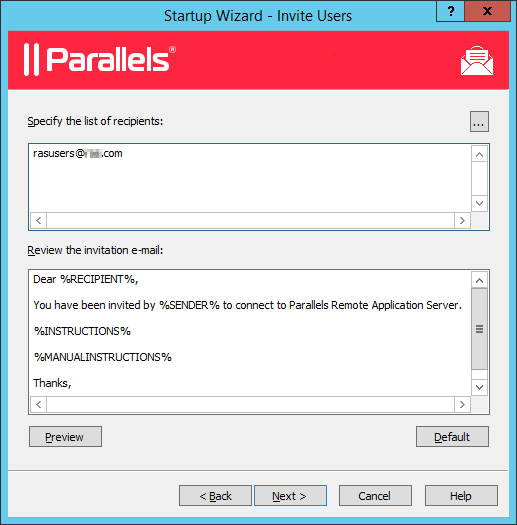
On the next page, specify the email recipients. Click the
[...]
button to select users or groups.
-
Review the invitation email template displayed in the
Review the invitation e-mail
box. You can modify the template text as needed. The template also uses variables, which are explained below.
-
%RECIPIENT%— Specifies the name of a recipient to whom the email message is addressed. -
%SENDER%— The sender's email address that you specified in the first step of this wizard when you configured the outgoing email server settings. -
%INSTRUCTIONS%— Includes a custom URL hyperlink for automatic configuration of Parallels Client. The URL uses the Parallels Client URL scheme. For more info, see RAS HTML5 Gateway API and Parallels Client URL Scheme . -
%MANUALINSTRUCTIONS%— Includes instructions for manual configuration of Parallels Client.
The variables are defined dynamically depending on the type(s) of the target devices and other settings. Normally, you should always include them in the message, so your users will receive all the necessary instructions and links. If you don't include any of the variables, you will see a warning message, but including all of them is not a requirement. To preview the message, click the Preview button. This will open the HTML version of the message in a separate window. This is the email message that your users will receive.
-
- Click Next , review the summary and click Next again to send the invitation email to users.
When users receive the invitation email, they will follow the instructions that it contains to install and configure Parallels Client on their devices. Once that's done, the users will be able to connect to Parallels RAS and launch published resources.
|
|