|
|
|
|
Add an RD Session Host
First, you need to add an RD Session Host to the Farm. In this tutorial, we'll add the local server on which Parallels RAS is installed.
To add an RD Session Host to the Farm:
-
Click
Add RD Session Hosts
. The
Add RD Session Hosts
wizard opens.
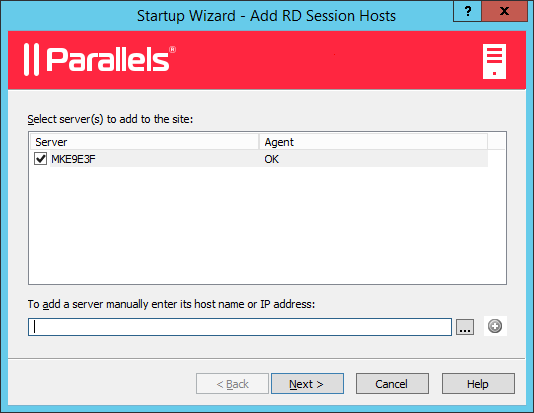
-
Select a server or type a server FQDN or IP address and then click the plus-sign icon to add the server to the list. If you are testing this by adding the localhost and see the FQDN warning, you can ignore it.
Note that if you enter the server FQDN, it will be used as the primary method of connecting to this server from other Parallels RAS components and clients. If you enter the IP address, it will be automatically resolved to FQDN, but only if the global option to resolve to FQDN is enabled. To see the current setting of this global option, click Tools > Options on the main menu. In the Options dialog, examine the Always attempt to resolve to fully qualified domain name (FQDN) when adding hosts option. When the option is selected, the IP address of every server/component in the RAS Farm is always resolved to FQDN. When the option is cleared, whatever is specified for a server (IP address or name) is used to communicate with a server. This makes a difference in deployments where an IP address cannot be used to access a server, such as when a server is hosted in the cloud. For more information, see Host Name Resolution .
- Click Next .
-
The page with general settings opens:
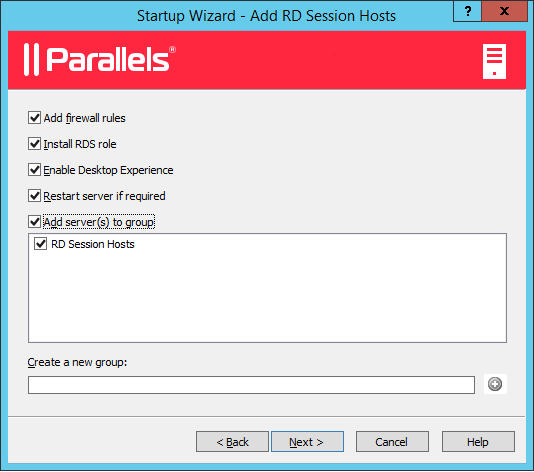
Specify the following settings:
- Add firewall rules . Add firewall rules required by Parallels RAS in Windows running on the server. See Port Reference for details.
- Install RDS role . Install the RDS role on the server if it's not installed. You should always select this option.
- Enable Desktop Experience . Enable the Desktop Experience feature in Windows running on the server. This option is enabled only if the Install RDS role option (above) is selected. The option applies to Windows Server 2008 R1/R2 and Windows 2012 R1/R2 on which the Desktop Experience feature is not enabled by default.
- Restart server if required . Automatically restart the server if necessary. You can restart the server manually if you wish.
- Add server(s) to group . Add the server (or servers) to a group. Select the desired group in the list box located below this option. Groups are described in detail in the Grouping RD Session Hosts section. If you are just learning how to use this wizard, you can skip this option.
- Click Next .
-
In order for end users to access published resources on the RD Session Host, they must be added to the Remote Desktop Users group in Windows running on the server. This can be done one of the following ways:
- Adding each user or group directly on the server using standard Windows administrative tools.
- Adding users or groups through Active Directory.
- Using the wizard page described below, which is provided for your convenience.
If you already added your users to the Remote Desktop Users group on the given server (or if for any reason you want to use one of the other methods listed above), you can simply click Next and skip this page.
To add users to the Remote Desktop Users group using the wizard, select the Specify users or groups to be added to the Remote Desktop Users group option and then click the [+] icon. In the Select Users or Groups dialog, specify a user or group and click OK . The selected user/group will be added to the list on the wizard page.
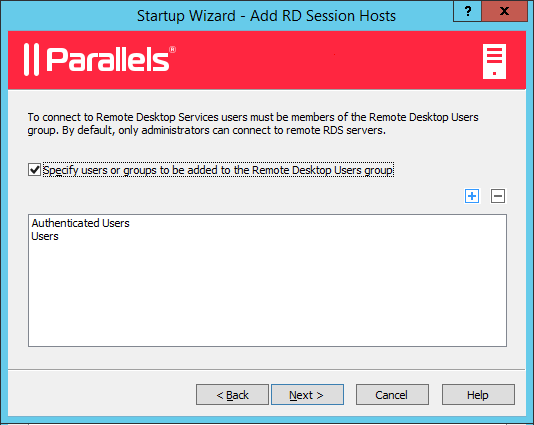
- Click Next .
-
The
User profile
page allows you to select a technology to manage user profiles.
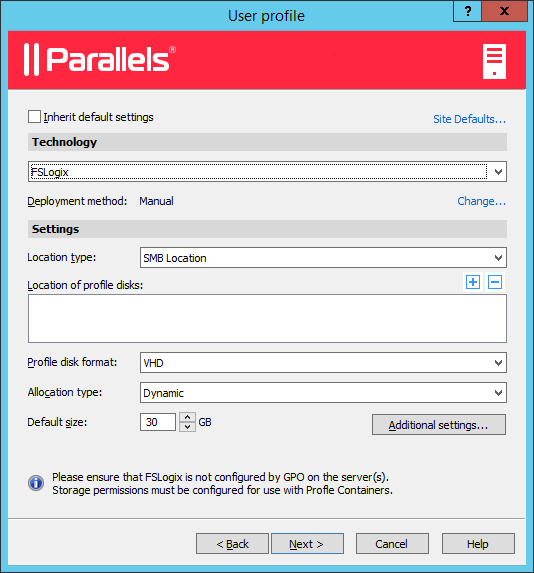
You can select from User profile disk or FSlogix . User Profile Disks are virtual hard disks that store user application data on a dedicated file share. Microsoft FSLogix Profile Container is the preferred Profile Management solution as the successor of Roaming Profiles and User Profile Disks (UPDs). It is set to maintain user context in non-persistent environments, minimize sign-in times and provide native profile experience eliminating compatibility issues. You can keep the default settings for now. We will talk in detail about user profiles later in this guide .
-
The
Optimization
page allows you to specify settings that will be used to optimize Windows on the RD Session Host for best performance in a Parallels RAS environment.
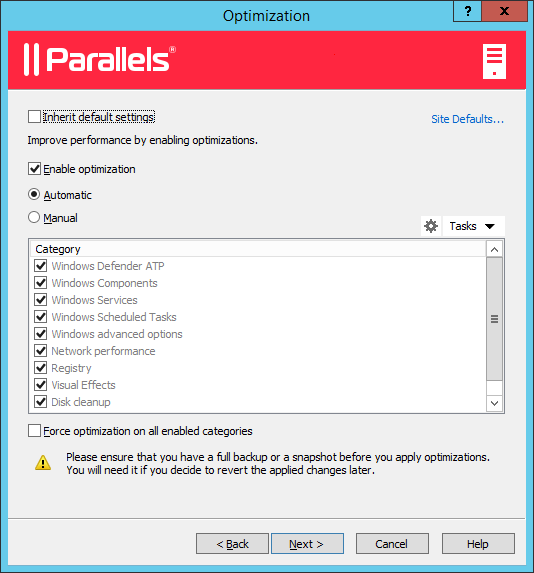
You can select Windows components, services, and other options that will be disabled, removed, or optimized to ensure a more efficient, streamlined, and improved delivery of virtual apps and desktops. You can keep the default settings or you can modify (or disable if not sure) optimization for now. Optimization is described in detail later in this guide .
- On the next page, review the settings and click Next .
- The Install RAS RD Session Host Agent dialog opens. Follow the instructions and install the agent. When the installation is finished, click Done to close the dialog.
- Back in the wizard, click Finish to exit.
If you would like to verify that the RD Session Host has been added to the Farm, click the Farm category (below the Start category in the left pane of the Parallels RAS Console window) and then click RD Session Hosts in the navigation tree (the middle pane). The server should be included in the RD Session Hosts list. The Status column may display a warning message. If it does, reboot the server. The Status column should now say, "OK", which means that your RD Session Host is functioning properly.
Read on to learn how to publish an application from an RD Session Host
|
|