|
|
|
|
Connecting to Parallels RAS
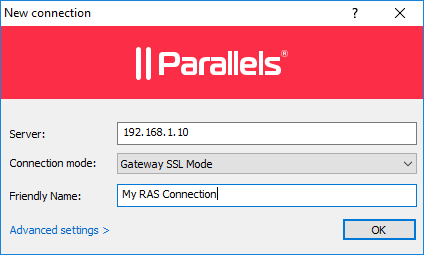
After you manually install Parallels Client and run it for the first time, you'll be asked if you would like to configure a new connection. Click Yes . This will open the New connection dialog.
Your system administrator should give you the connection information that must be specified in this dialog. If you received an invitation email from your administrator, you can find this information at the bottom of the message. The information will look similar to the following:
To manually configure the RAS Connection, use the following settings:
Server: 192.168.1.10
Port: 443
Connection Mode: Gateway SSL Mode
To specify the connection properties:
- In the Server field, enter the Parallels RAS IP address or hostname (this should be the server where the RAS Secure Client Gateway resides).
-
In the
Connection mode
field, select one of the following options (note that you should use the mode that your system administrator has asked you to use):
- Direct Mode . Parallels Client first connects to the RAS Secure Client Gateway for the best available terminal server and then connects directly to that server. This is best used when the Parallels Client and the terminal server reside on the same network.
- Direct SSL Mode . Same as the direct mode above, but uses encryption to secure the data.
- Gateway Mode . Parallels Client connects to the RAS Secure Client Gateway and the session connection is tunneled through the first available connection. This mode is ideal for servers that are only reachable via the gateway and do not require a high level of security.
- Gateway SSL Mode . Same as the gateway mode above, but uses encryption to secure the data.
- In the Friendly name field, choose and type a friendly name for this connection.
-
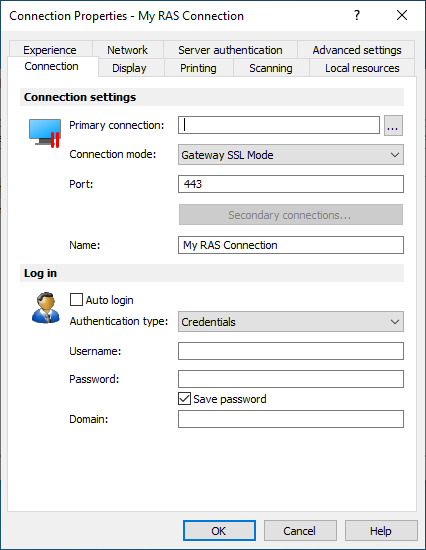
If your system administrator instructed you to specify the port number, do the following:
- Click the Advanced settings link. The Connection Properties dialog opens (see the screenshot below).
- Specify the port number in the Port field.
- You can also review and modify other properties if you wish. More on these later in this guide.
- The [...] button next to the Primary Connection field allows you to select a Parallels RAS server (this will only work if the Broadcast RAS Secure Client Gateway Address option has been enabled on the server side).
-
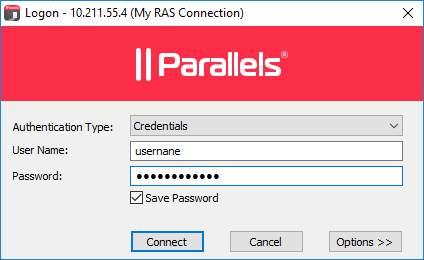
Click
OK
. The
Logon
dialog opens.
-
In the
Authentication type
drop-down list, select the desired method of authentication:
- Credentials . Select this option and then enter your username and password. You will be authenticated on the remote server using the specified credentials.
- Smart Card . Select this option to authenticate using a smart card. When connecting to the remote server, insert a smart card into the card reader and then enter a PIN when prompted.
-
Single Sign-On
. This option will be included in the list only if the Single Sign-On module is installed during Parallels Client installation. Select this option to use local system credentials to connect to the remote server
Note for Administrators: The allowed authentication type(s) must be specified in the RAS Console in Connection / Authentication .
- Click Connect .
- This step may, or may not, appear depending on whether the two-factor authentication using the Google Authenticator app is configured in Parallels RAS by the administrator. If Parallels RAS is configured to use Google Authenticator, you will need to take additional steps. First you need to install the Google Authenticator app on your mobile device. When you click Connect in Parallels Client, you'll see a dialog displaying a barcode (also known as QR code) and a secret key. Scan the code (or enter the secret key) into the Authenticator app. The app will generate a one time password. Click Next in Parallels Client and enter the one time password in the OTP field. Click Connect . On every subsequent logon, you'll only have to enter the OTP. For step-by-step instructions, see the Using Google Authenticator subsection below.
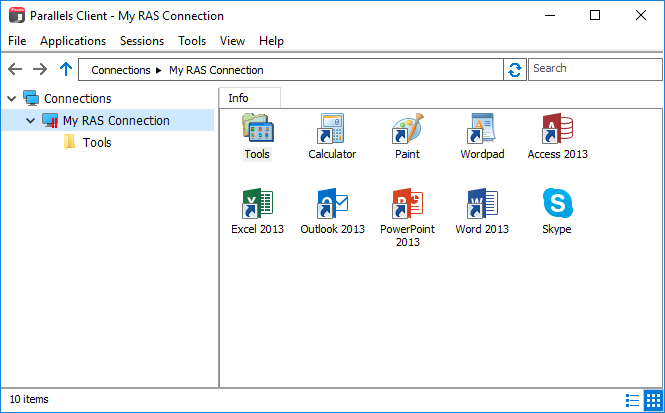
- If the connection is successful, you'll see the main Parallels Client window where your connection(s) and published resources are displayed.
Using Google Authenticator
Use the following instructions when you see the multi-factor authentication dialog during the login procedure. The dialog is displayed when your IT administrator configures two-factor authentication using the Google Authenticator app.
Important: To use Google Authenticator, the time on your computer must be synchronized with a global NTP time server, such as time.google.com. Otherwise, Google authentication will fail.
To use Google Authenticator, you need to install the Authenticator app on your iOS or Android device. Simply visit Google Play or App Store and install the app. Once the Authenticator app is installed, you are ready to connect to Parallels RAS using two-factor authentication.
To connect to Parallels RAS:
- Opens Parallels Client and log in using your credentials.
- The multi-factor authentication dialog opens displaying a barcode (also known as QR code) and a secret key.
-
Open the Google Authenticator app on your mobile device:
- If this is the first time you use it, tap Begin and then tap Scan a barcode .
- If you already have another account in Google Authenticator, tap the plus-sign icon and choose Scan a barcode .
-
Go back to your computer and scan the barcode displayed in the Parallels Client login dialog.
If scanning doesn't work for any reason, go back in the Authenticator app, choose Enter a provided key and then enter the account name and the key displayed in the Parallels Client login dialog.
- Tap Add account . This will create an account for your RAS connection and display a one time password.
- Go back to Parallels Client, click Next and enter the one time password in the OTP field.
On every subsequent logon, you only need to type your credentials (or nothing at all if the Save password options was selected) and enter a one time password obtained from the Google Authenticator app (the app will continually generate a new password). Please note that your IT administrator has an ability to reset user accounts in Google Authenticator. If your account is reset, you'll need to repeat the registration procedure described above.
|
|