|
|
|
|
Creating Virtual Machines in Express Mode
Installation in the Express mode is supported for the following operating systems:
- Windows 7
- Windows Vista
- Windows XP
- Windows Server 2003
- Windows 2000 Server
- Ubuntu 9.10 and higher
- Red Hat Enterprise 4.8, 5.6, and 6
- Fedora 13 and higher
To create a virtual machine in the Express installation mode, do the following:
- Start Parallels Management Console, and choose New from the File menu. This launches the New Virtual Machine wizard.
- In the Select Operating System Type and Version window, select the guest OS to install in the virtual machine, and click Next .
- In the Virtual Machine Type window, select Express Windows or Express Linux depending on the operating system you plan to run in the virtual machine, and click Next .
-
In the
Name and Location
window, define the name and location for the virtual machine:
- Name . Indicate an arbitrary name for the virtual machine. By default, the virtual machine gets the same name as the operating system installed in it. If a virtual machine with such a name already exists, you are prompted to indicate another name. The name must not exceed 50 characters.
-
Location
. Use the
Choose
button, if necessary, to change the default location of the virtual machine files.

Click Next .
-
In the
Express Windows/Linux Installation
window, do the following:
- Specify a user name and (for Linux virtual machines only) a password to log in to the virtual machine. For Windows virtual machines, the password is blank; you can set it manually once the operating system installation is complete.
- (For Windows virtual machines only.) Enter the product key for your Windows operating system. If you do not specify the product key in this step, you will have to provide it later when the Windows guest OS installation starts.
- If necessary, click the Advanced button, and configure the number of CPUs and the amount of RAM for the virtual machine.
- (For Windows virtual machines only.) Select the 64-bit Windows version option if you are installing a 64-bit version of the guest operating system.
- Click Create .
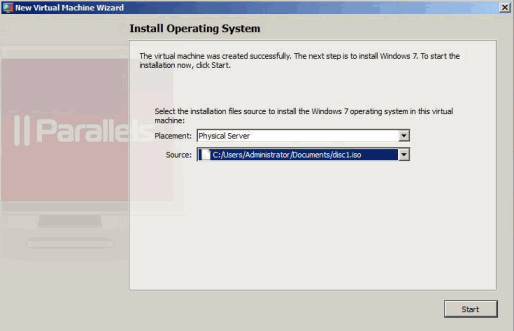
-
Once the virtual machine is created, the
Prepare to Install Operating System
window appears. In this window, specify the source of installation files, and click
Start
. To specify the path to the source installation files, select
Physical Server
or
Client Computer
in the
Placement
list depending on whether the files are located on the Parallels server or on a computer running Parallels Management Console and do one of the following:
- If the installation files are located on a CD or DVD, choose the respective drive in the Source list.
-
If you have a CD or DVD image with the installation files, click
Choose an image file
in the
Source
list and locate the image.
Notes:
1. OS installation CDs and DVDs are not included with your Parallels product. You must obtain an operating system separately.
2. For a Linux virtual machine, the source installation files may be located on the Parallels server only.
Once you click Start , the new virtual machine is started and the guest operating system is installed in it. After the installation, Parallels Management Console automatically installs Parallels Tools in the virtual machine.
|
|
 Feedback
|