|
|
|
|
View and Modify Terminal Server Properties
To configure a Terminal Server:
- In the RAS Console, navigate to Farm / Site / Terminal Servers .
- Right-click a server and click Properties in the context menu.
- The Server Properties dialog opens where you can configure the terminal server.
The rest of this section describes how to set individual server configuration properties.
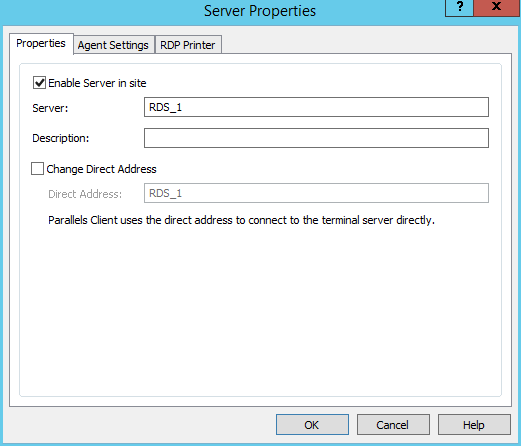
General
Select or clear the Enable Server in site option to enable or disable a server in the site. By default, a server is enabled. A disabled server cannot serve published applications and virtual desktops to clients.
Other elements on this page are:
- Server: Specifies the server name.
- Description: Specifies the server description.
- Change Direct Address: Select this option if you need to change the direct address that Parallels Client uses to establish a direct connection with the terminal server.
Agent
Each terminal server in the farm has a RAS Terminal Server Agent installed to provide a connection between the Parallels Remote Application Server and the terminal server. Use the Agent tab page to configure the agent.
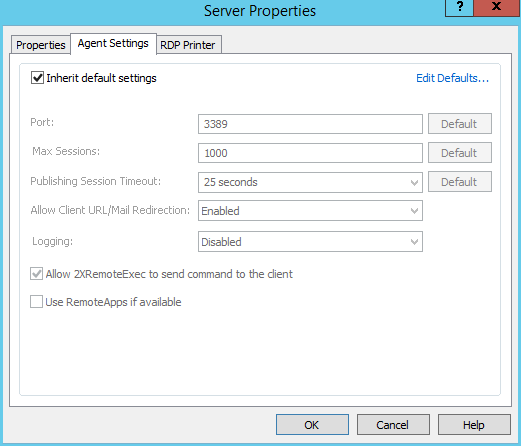
To use default settings, select the Inherit default settings option. To view or modify the default settings, click the Edit Defaults link.
If you want to specify custom settings for a given server, clear the Inherit default settings option and specify agent properties as follows:
- Port . Specifies a different remote desktop connection port number if a non-default port is configured on the server.
- Max Sessions . Specifies the maximum number of sessions.
- Publishing Session Disconnect Timeout . Specifies the amount of time each session remains connected in the background after the user has closed the published application. This option is used to avoid unnecessary reconnections with the server.
- Publishing Session Reset Timeout . This feature allows you to control how long it takes for a session to be logged off after it is marked as "disconnected".
- Allow Client URL/Mail Redirection . Select this option to allow http and mailto links to be opened using a local application on the client computer rather than the server’s resources. To configure a list of URLs which should not be redirected, navigate to the URL Redirection tab in the Settings node of a site.
- Allow 2XRemoteExec to send command to the client . Select this option to allow a process running on the server to instruct the client to deploy an application on the client side. More about 2XRemoteExec in the Using RemoteExec subsection below.
- Enable applications monitoring . Enable or disable monitoring of applications on the server. Disabling application monitoring stops the WMI monitoring to reduce CPU usage on the server and network usage while transferring the information to RAS Publishing Agent. If the option is enabled, the collected information will appear in a corresponding RAS report. If the option is disabled, the information from this server will be absent from a report.
- Use RemoteApps if available . Enable this option to allow use of remote apps for shell-related issues when an app is not displayed correctly. This feature is supported on the Parallels Client for Windows only.
Using 2XRemoteExec
2XRemoteExec is a feature that facilitates the servers ability to send commands to the client. This is done using the command line utility
2XRemoteExec.exe
. Command line options include:
|
Command Line Parameter |
Parameter Description |
|
|
Used to run the 2XRemoteExec command in ‘silent’ mode. Without this parameter, the command will display pop up messages from the application. If you include the parameter, the messages will not be displayed. |
|
|
Is used to specify the timeout until the application is started. Timeout must be a value between 5000ms and 30000ms. Note that the value inserted is in ‘ms’. If the timeout expires the command returns with an error. Please note that the application might still be started on the client. |
|
|
Shows a help list of the parameters that 2XRemoteExec uses. |
|
|
The Application that will be started on the client as prompted from the server. |
2XRemoteExec examples:
The following command displays a message box describing the parameters that can be used.
2XRemoteExec -?
This command runs Notepad on the client.
2XRemoteExec C:\Windows\System32\Notepad.exe
In this example, the command opens the
C:\readme.txt
file in the Notepad on the client. No message is shown and 2XRemoteExec would wait for 6 seconds or until the application is started.
2XRemoteExec C:\Windows\System32\Notepad.exe “C:\readme.txt”
User Profile Disks
User profile disks store user and application data on a single virtual disk that is dedicated to one user’s profile. Virtual disks are reattached at logon and are completely transparent to the user, so the user can save their data or change and save their app settings on what appears to be a local disk. All personal data and settings persist when connecting to different computers in a virtual desktop collection or session collection.
To use default user profile disks settings, select the Inherit default settings option. To view or modify the default settings, click the Edit Defaults link.
To use specific settings:
- Clear the Inherit default settings option.
- Select the Enable user profile disks option.
- Specify a network location where the disks should be created using the Microsoft Windows UNC format (e.g. \\RAS\users\disks).
- Specify the maximum allowed disk size (in gigabytes) in the Maximum size field.
Please note that the server must have full control permissions on the user profile disk share.
RDP Printer
The RDP Printer tab page allows you to configure the renaming format of redirected printers. The format may vary depending on which version and language of the server you are using.
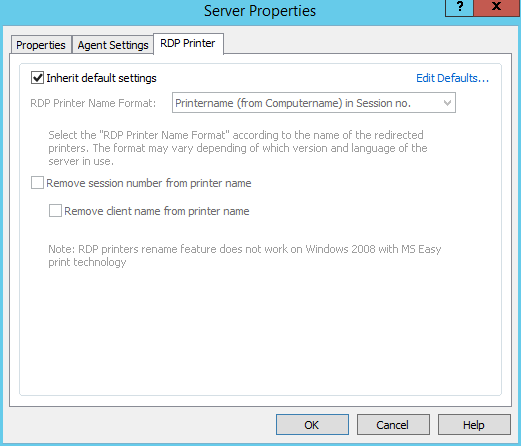
To use the default RDP printer settings, select the Inherit default settings option. To view or modify the default options, click the Edit Defaults link.
The RDP Printer Name Format drop-down list allows you to select a printer name format specifically for the configured server.
Select the Remove session number from printer name and/or the Remove client name from printer name to exclude the corresponding information from the printer name.
|
|
 Feedback
|