|
|
|
|
Inviting Users to Connect to Parallels RAS
Parallels Remote Application Server supports multiple platforms, ranging from desktop PCs and Macs to mobile devices and ChromeApps. The Invitation Email feature is designed to reduce the complexities involved in the installation and client rollout process. This feature allows the administrator to send client installation and auto-configuration instructions to end users right from the RAS Console.
Quickly Sending an Invitation Email to Users
You can quickly send an invitation email to users from the Start category in the RAS Console. The Invite Users Wizard there implements a streamlined process that requires minimal user interaction. The process is described in the Setting Up a Simple RAS Environment section .
The rest of this section describes how to invite users from the Administration category. This process consists of more steps, but gives you more control over the available options.
Sending an Invitation Email to Users
The preferred (and more convenient) method of sending an invitation email is from the Start category as described in the Setting Up a Simple RAS Environment section . The functionality described here is another way of doing it, so you can choose whichever method you like best.
Before proceeding, first confirm you have correctly configured the mailbox as described in Configuring SMTP Server Connection for System Notifications via Email .
To send an invitation email:
-
In the RAS Console, select the
Administration
category and then click the
Send Invitations
tab in the right pane.
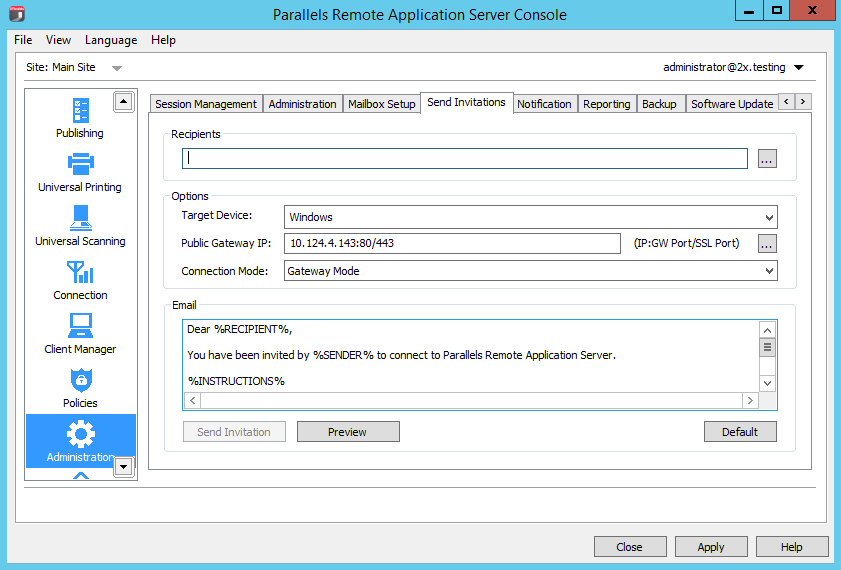
- Select recipients in the Recipients section. You can browse your Active Directory and simply select a user or a group.
-
In the
Target Device
drop-down list, select the platform that recipients are running. The supported platforms are:
- Windows
- Mac
- HTML5 (HTML5 enabled browsers)
- iOS
- Android
- ChromApp
- Linux
- In the Public Gateway IP field, specify the the gateway domain name or IP address. Please note that this can be a public IP address in order to reach the system from a remote user.
- In the Gateway Mode drop-down list, select a gateway connection mode. Note that SSL modes require the gateway to have SSL configured.
- The Advanced button is used to specify a third-party credential provider component. Click the button and specify the provider GUID. For more information, see Configure Client Policy Options > Single Sign-On .
-
The
Email
section displays the message template that will be used to create the message. You can modify the template if you wish. The variables that can be used in the template are:
-
%RECIPIENT%— Recipient username -
%SENDER%— The administrator account which the email is sent from. -
%INSTRUCTIONS%— Includes the automatic configuration process. -
%MANUALINSTRUCTIONS%— Includes the manual configuration process.
-
- Upon completion, click the Preview button to preview your email message. If satisfied, click the Send Invitation to send the email to the specified recipients.
|
|
 Feedback
|